Recording
Overview
Time: 20 minObjectives
know about recording tips for podcasts
Audio recording using Audacity
Recording Tools
One main ingredient for podcast production is the recording. There are various types of software’s present in the world that will help you to record the audio. These software’s will empower the creators to deliver high quality podcast with limited resources. Few of the those software’s are discussed below:
Record using audio software
If you’re hosting your show solo, this will be the easiest way to record your podcast. Why? Because all you need is a USB mic and your favorite editing program. Setting up is as simple as plugging your microphone in, making sure it’s selected in your audio preferences and hitting record. It’s important to note that if you’re using more than one USB mic you’ll need to do a bit of configuring in the back end to get things working.
-
Audacity: This is a free program a lot of podcasters use. If you’re just starting out and working out whether this is something you want to do long-term, this program is a great place to start.
-
Adobe Audition: A subscription program I use to edit all my podcasts. It’s used by professionals but it’s not as intimidating as a program like Pro Tools so you can still easily get a handle on it if you’re a beginner.
Record using video conferencing software
You can use platforms like Skype and Zoom to record your podcast but these are video conferencing software’s rather than platforms that were created specifically for podcasting so they often yield lower-quality audio. If you’re recording using Skype you’ll need to purchase some additional software that will give you more flexibility with the audio (Ecamm for Mac and Pamela for PC). If you’re using Zoom there are some settings in the back end that can help you get better quality audio.
Record using remote recording platform
The great thing about these platforms is they’ve been created specifically to record podcasts. That means if everyone has their own microphone and they’re recording in a good space you can get really high-quality audio. A lot of the platforms like Zencastr, Squadcast and Riverside.fm also incorporate video which is really important when you’re remote recording because you need to be able to see who you’re talking to.
Record using a portable recording device
A portable recorder can be a great option if you want to record people in person. Devices like the Zoom H6 and the Zoom Potdtrak are lightweight and reliable and you can also use them as an audio interface which lets you use your XLR microphones in your computer. These are a really versatile option if you want a podcasting kit that gives you the flexibility to record anywhere.
Record using Anchor
There are pros and cons to this app because while I’m all for making podcasting easier I don’t think that should ever come at the expense of quality. As someone who’s used to more granular editing software, I found Anchor didn’t give me as much flexibility as I needed in my edits. But you might be an absolute gun at this program and feel like it’s the best option for you to make something that sounds great. If that’s the case, go for it!
The one thing to consider no matter which method you choose. Make sure you think long and hard about where you record. If you’re setting up a home studio your recording space needs to be audio friendly. That means avoiding rooms with reflective surfaces like tiles, windows or high ceilings. You don’t need to spend a lot of money getting this right. In fact, a few thick curtains or couch cushions will do. But you have to put thought into the quality of sound when you’re recording if you want your show to be a success.
Recording Environment
-
Record in a closet : Soft surfaces, like clothes, can absorb the sound waves, which is why a lot of podcasters record their shows in their closets. If you can fit in there with your equipment, go for it.
-
Close your windows and turn off machines that make noise : Turn off air conditioners and fans. If your computer is working overtime and sounds like an airplane about to take off, restart it. In fact, it’s a good idea to restart your computer anyway before a remote interview to give it a little refresh.
-
Help out your guests : If you are doing an interview with a guest, you want their recording environment to sound good, as well. If they are in a noisy office with other people talking, that sound is going to get picked up and will be really distracting to your listener. So give them a heads up before the interview on what they need to do to prepare
-
Use a dynamic, cardioid microphone : As I mentioned in the last episode on podcast equipment, most podcasters would benefit from using the ATR2100 or the Samsun Q2U.The cardioid polar pattern on these mics mean they are picking up what is in front of them – you – and less background noise. These dynamic mics are less sensitive than condenser mics like the Blue Yeti, which pick up all the noise around them
-
Point your mic away from the noise you don’t want picked up
-
Record 5 seconds of silence before you start speaking: Most rooms in which you will record will have some kind of noise to them. Capturing a few seconds of room tone without your voice will make it easier for you to remove the white-noise buzz of the room later when you’re cleaning up your audio. You’ll do this via a process called noise reduction, which you’ll find in your Digital Audio Workstation, like Adobe Audition or Audacity.
-
Sound treat your walls: You could build your own studio if you have an extra room. This means rugs or carpet for the floor and acoustic foam for the walls. Or you could just use mattress foam or packing blankets, or any blanket you have.
Your recording environment is so important. Unexpected things happen. So, record as cleanly as you can to make your editing and mixing life easier later on.
Recording using Audacity
-
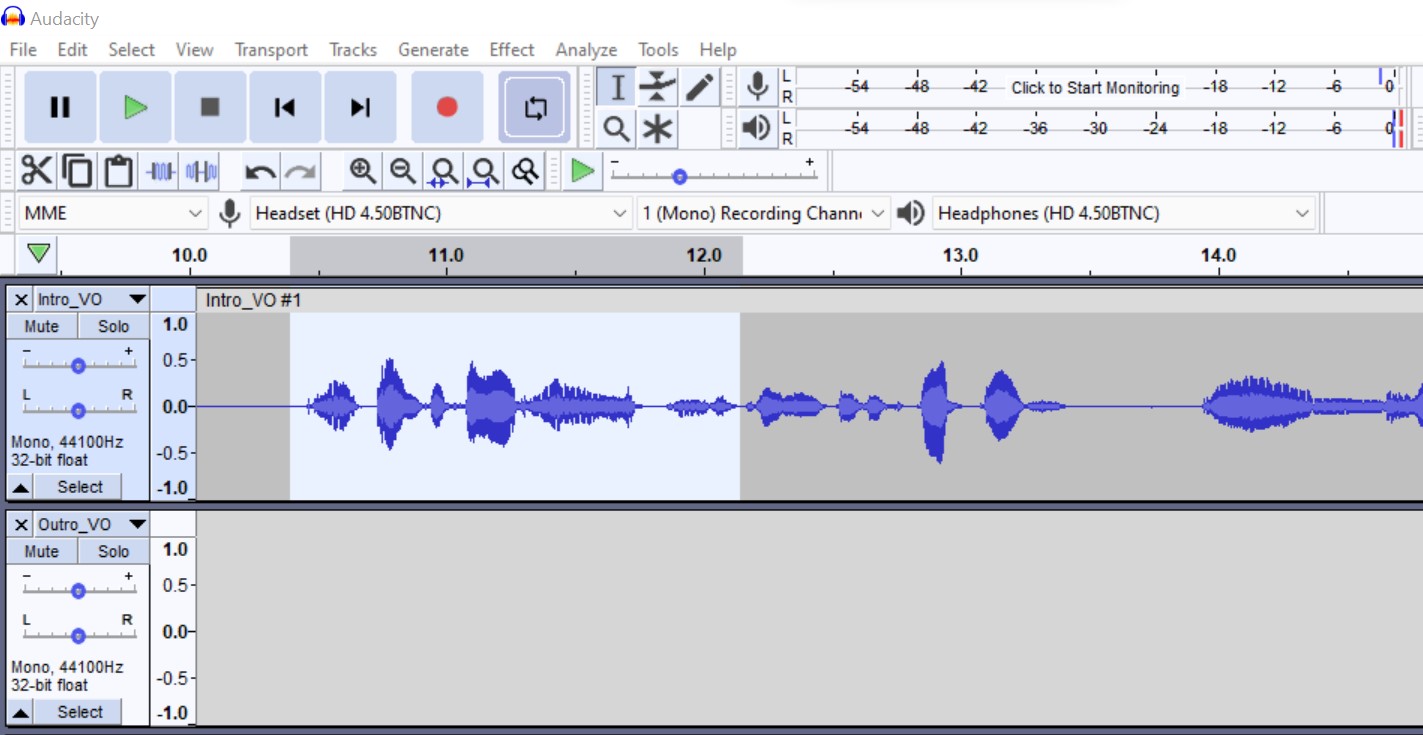
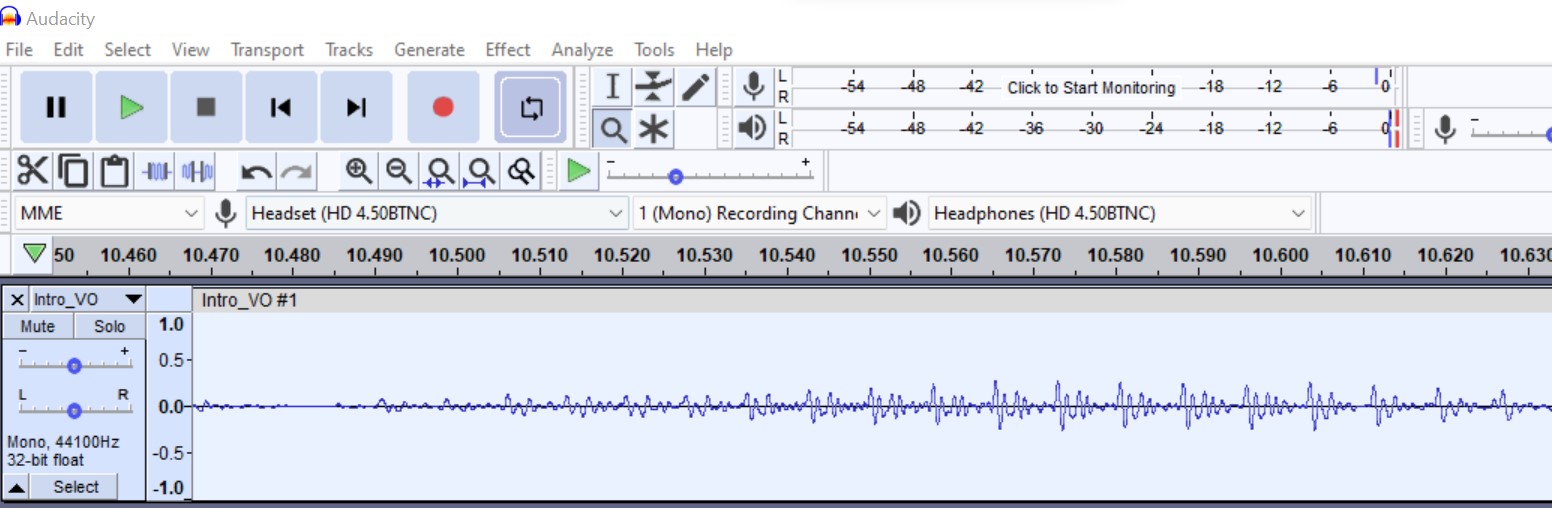
Audacity home page view

- Microphone - Dropdown menu from which the microphone to record your audio can be selected.
- Speaker - Dropdown menu from which the speaker to hear your recorded and edited audio can be selected.
- Recording channel - Used to select Mono or stereo type of recording.
-
Recording level - It shows the microphone sensitivity to sound. Ideal high range is 12.

- Record : Starts recording the audio.
- Stop : Stops the Recording.
- Play back : bring the cursor to the beginning of the recording
-
Play next : Bring the cursor to the ending of the recording

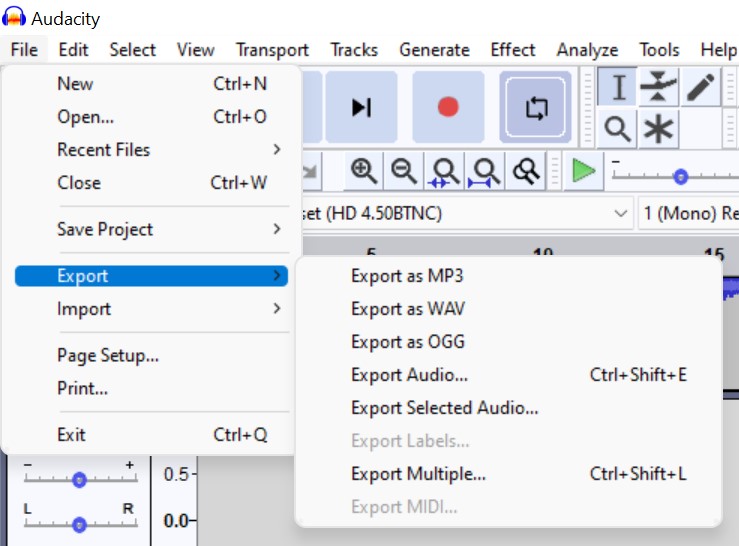
- export the audio to mp3 or other output formats.
Key Points
Learnt about recording tool
Understood about recording Environment
Introduced audacity for recording
Editing
Overview
Time: 30 minObjectives
Learn Audio editing using Audacity
Editing
Audio Editing is the process by which you refine your story, craft a sense of flow, and mitigate any audible distractions. It’s a largely subtractive process of trimming your raw recording down and rearranging it, where necessary, into its most compelling form.
This is generally the time to lay out any sound effects, transitions, music, or pre-recorded advertising you may be including in your episode, as well as employ any necessary de-noising processing to your tracks.
Select
The whole of an individual track can be selected by clicking in the Select button in the Track Control Panel to the left of a track. Holding Ctrl (or ⌘ + A on a Mac) and clicking on the Select button toggles the selectedness of the track.
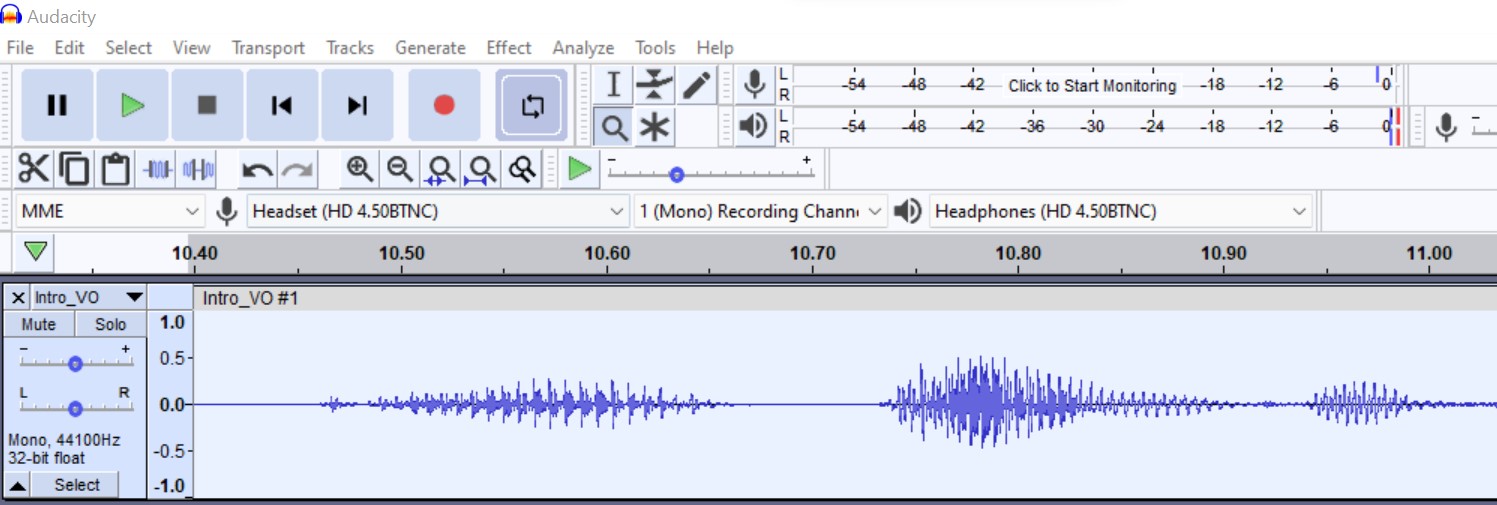
Zoom
The Zoom commands enable you to control the amount of audio, longer or shorter periods of time, that is visible on your screen. Hold down the Ctrl key on your keyboard then scroll up to zoom in, or scroll down to zoom out. For example. you can zoom in at or near the start or end of a selection by placing your cursor position there.
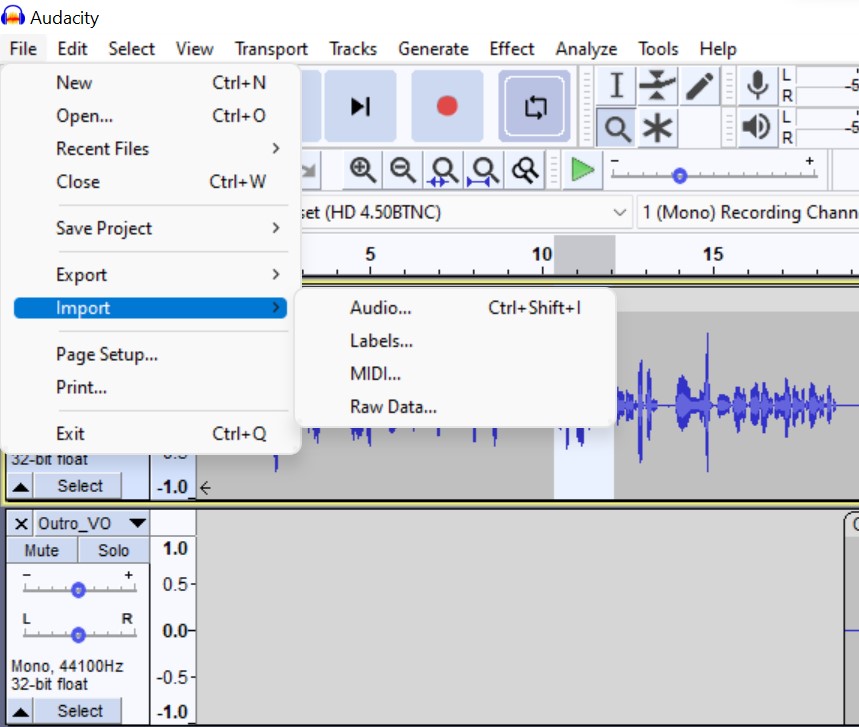
Import Audio
Enables you to import audio files or label files into your project. Files in various audio formats can be imported into Audacity.
Select the File > Import > Audio… command, then choose one or more audio files, Audacity will import the selected file(s) into the existing project. This is useful to bring the content of one or more audio files into a project that already contains audio (for example, to mix several audio files together).
Gain
The “Gain” control on the left end of each audio track controls how loud the track plays. It does not change the actual audio data (which in on your hard drive), it just changes the playback level. It is therefore safe to move that up and down as often as you like and it will not affect the audio data that is on disk.

Delete
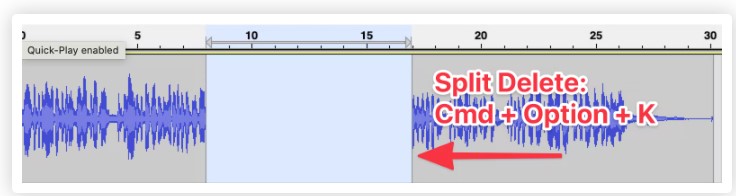
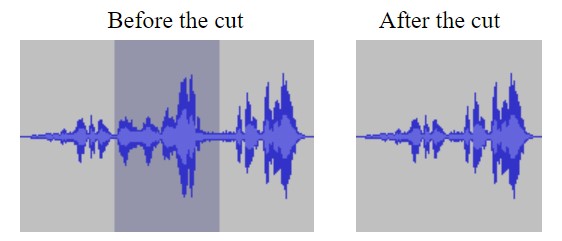
The Delete command removes a selected area without shifting the audio to the right of the selection, leaving a space where the audio once was. Delete comes in handy when you want to create a gap between clips to insert a segment, interview, or advertisement.
To delete a portion of your audio, highlight the selection and go to Edit > Remove Special > Split Delete, or use the keyboard shortcut Cmd + Option + K. As you can see in this example, the command deleted the selected audio and did not shift the clip over.
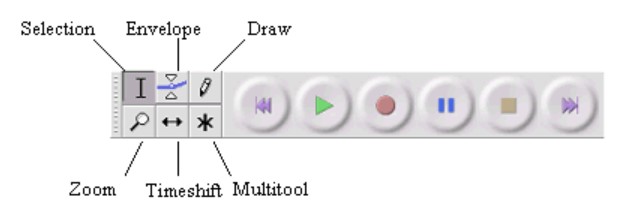
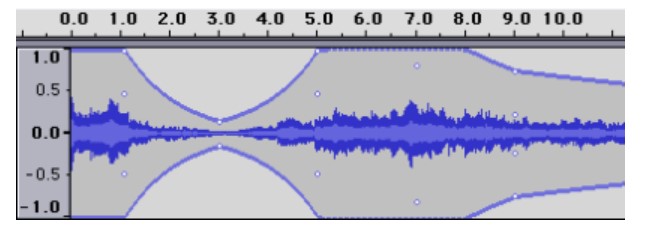
Envelope tool
When you use the envelope tool, you will be able to control and manipulate the control points on a track. These control points will help to determine the changes in volume over a period of time. However, you cannot use this tool when you pause a track.
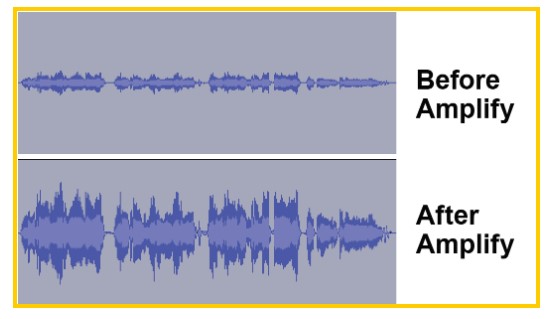
Amplify
Overall clip and track volume can be adjusted in two ways: with the volume slider in the track controls, and with the Amplify effect. We recommend using Amplify to increase volume in most cases, because the volume changes are visually reflected in the waveform via height changes. Adjustments with the volume slider, on the other hand, do not affect the waveform height, which can be confusing.
Select the desired clips(s).
- For a single clip, click the top of the clip (near the clip name).
- For multiple clips, click-and-drag to highlight the desired clips with the Selection Tool.
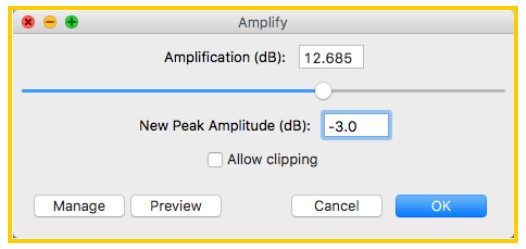
- Navigate to Effect > Amplify. A new window will appear.
- Set the New Peak Amplitude to -3.0 db. This will increase the clip volume to an ideal level.
Time Shift
The Time Shift Tool does exactly what it sounds like: it allows you to shift the point in time where an audio file starts playing. We’ll use this sample audio file as an example.
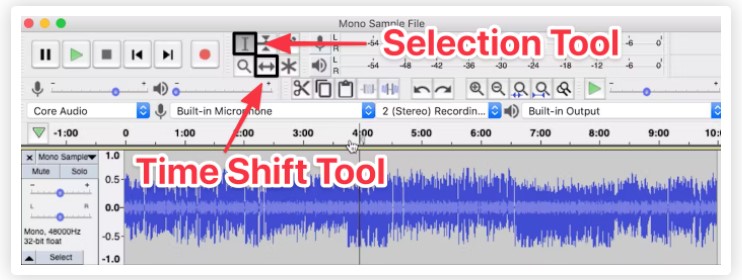
Now you can select the Time Shift Tool — the button with the bidirectional arrows located at the top of your workspace — and move the clip back and forth on the Timeline to adjust the waveform to a specific time point.
For example, you can adjust the waveform to start exactly at the one minute mark, so it starts playing one minute into the episode.
Cut/Copy
Tools to copy, duplicate and paste audio. Audio can only be pasted into the same track or another audio track.
- Selections in Label tracks can be cut and pasted to Label tracks.
- Selections in Note tracks can be cut and pasted to Note tracks.
Only one item can be on the clipboard at a time.
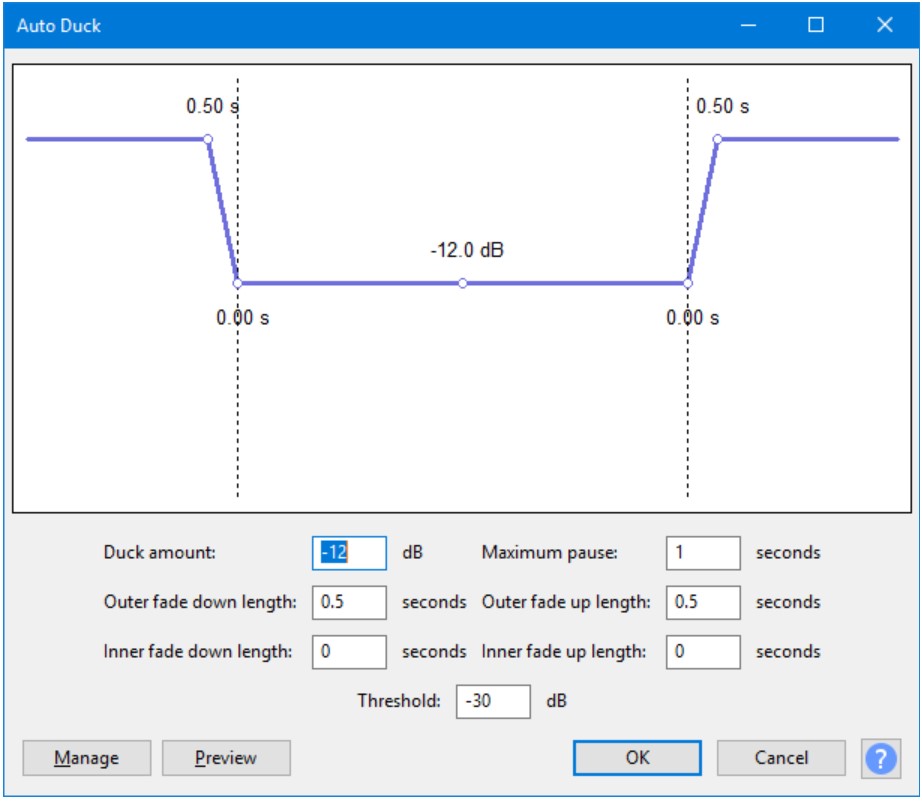
Auto Deck
Auto duck reduces the volume of a selected track, when volume reaches a threshold value. The number of the selected tracks can be one or more. It can be used for podcasts and to ramp up background music, generally used for radio communication. It can also turn down voice as soon as the translation of the original music comes.
Accessed by: Effect > Auto Duck…
Fade out/in
After highlighting and selecting a piece of audio, choose Fade in or Fade out from the Effects menu and Audacity will taper off the sound for Fade Out or bring up the volume for Fade Out.
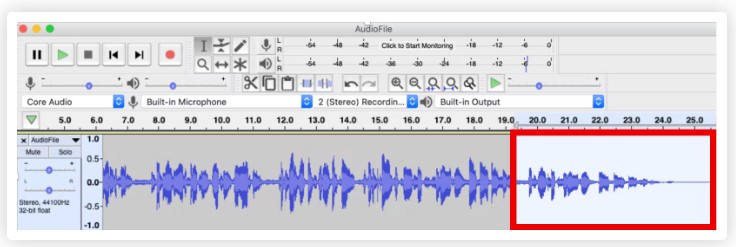
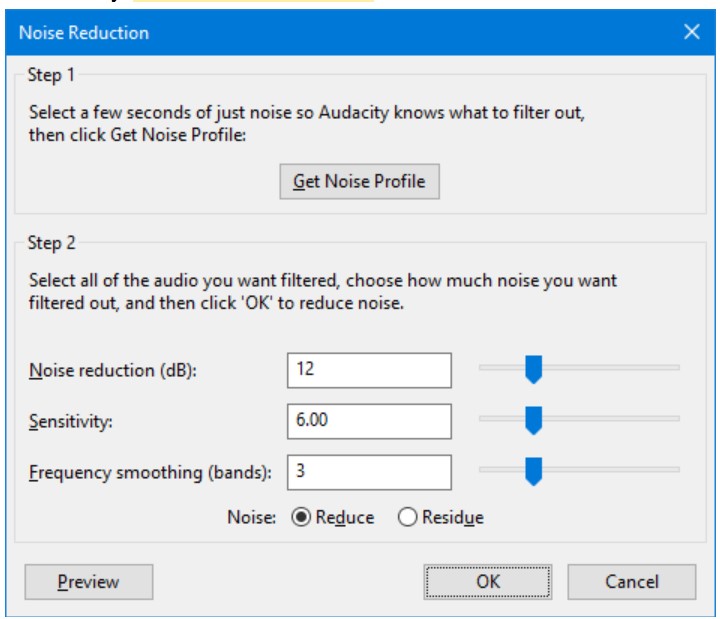
Background noise Reduction
Noise Reduction can reduce constant background sounds such as hum, whistle, whine, buzz, and “hiss”, such as tape hiss, fan noise or FM/webcast carrier noise. It is not suitable for individual clicks and pops, or irregular background noise such as from traffic or an audience. To use Noise Reduction, you need a region in the waveform that contains only the noise you want to reduce.
Be aware that it may be impossible to get a satisfactory removal when the noise is very loud, when the noise is variable, when the music or speech is not much louder than the noise or when the noise frequencies are very similar to those of the music or speech.
Accessed by: Effect > Noise Reduction…
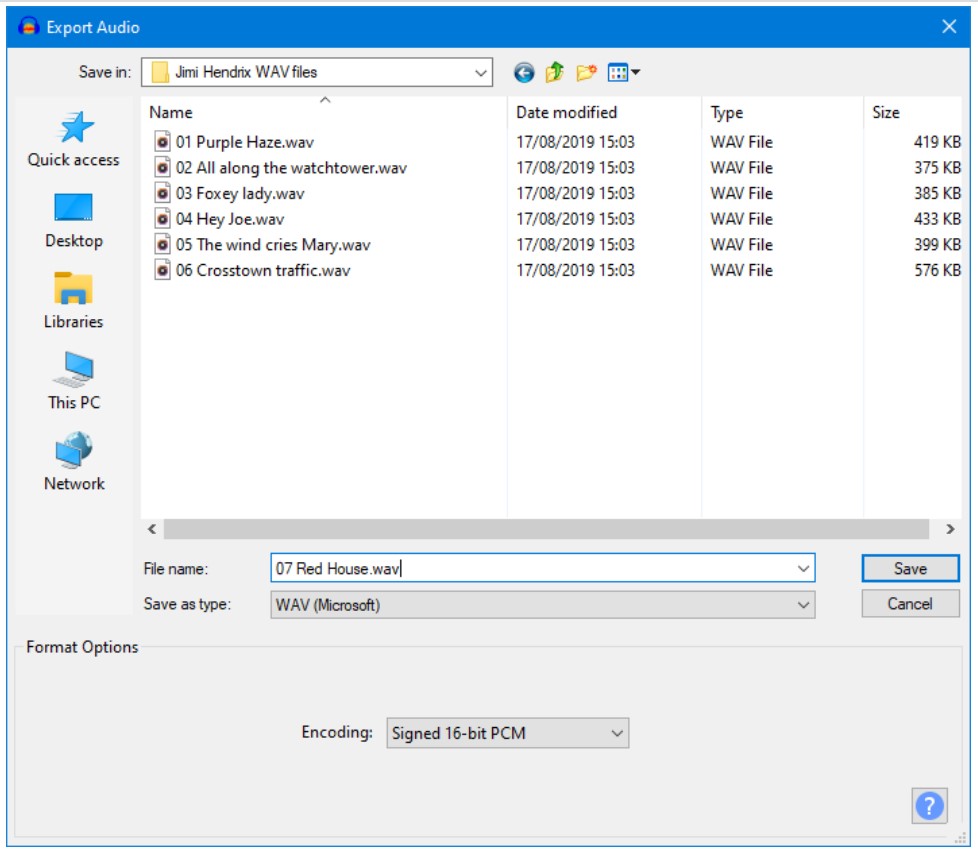
Export
he Export Audio dialog (for export of a single audio file from the whole project) is accessed from File > Export > Export Audio…. When you use File > Export > Export Selected Audio… to export a single audio file from a selection, the Export Selected Audio dialog appears. Both these dialogs are identical (apart from the dialog title) and let you specify folder location, file name, format and encoding options for your exported file.
Accessed by: File > Export > Export Audio… or File > Export > Export Selected Audio…
Key Points
Learnt various tools in audacity that will help in audio editing
Publishing
Overview
Time: 10 minObjectives
Publishing the podcast over the internet
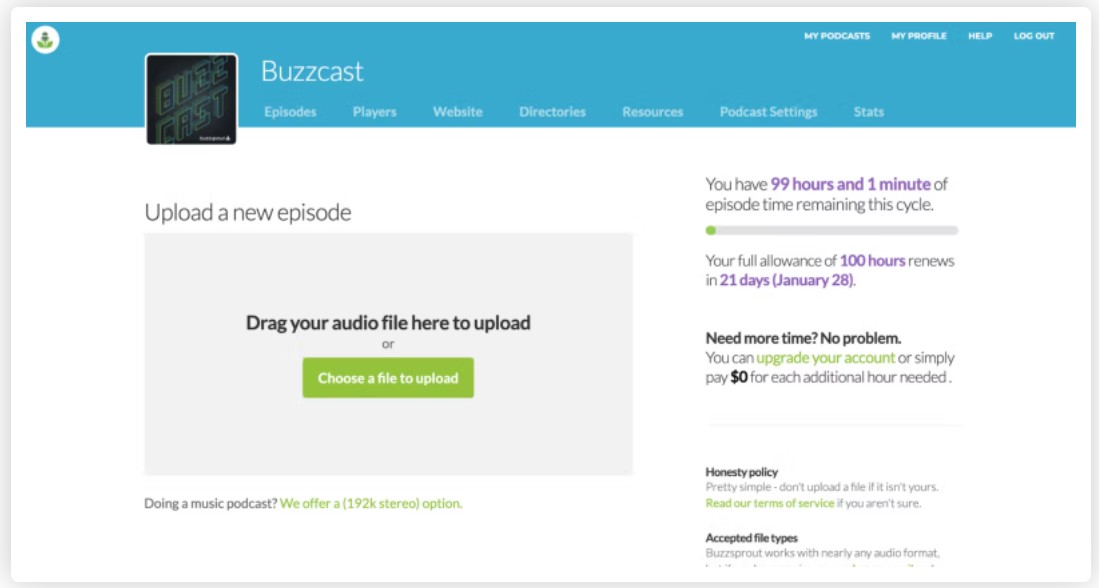
Publishing using Buzzsprout
Go to Podcast Setting inside Buzzsprout to fill in your podcast title, artwork, and description. This information helps you appear in search engine queries. Your podcast description is where you tell listeners what they can expect from your content. It’s also a good place to use keywords to draw people’s attention. If you have a business podcast, use related words and phrases so readers know your content is relevant to them.
-
Upload podcast artwork
-
Pick a podcast category
-
Upload your first episode
-
Write podcast show notes
Bonus features in Buzzsprout
- Buzzsprout customizable website
- Transcripts
- Magic Mastering
- Visual Soundbites
Get listed in Streaming platform
Podcast directories, like Apple Podcasts, are a centralized place for podcast listeners to find new shows.
Getting listed in the top podcast directories is a critical part of your podcast marketing strategy. Most of your new listeners will find your podcast through these directories.
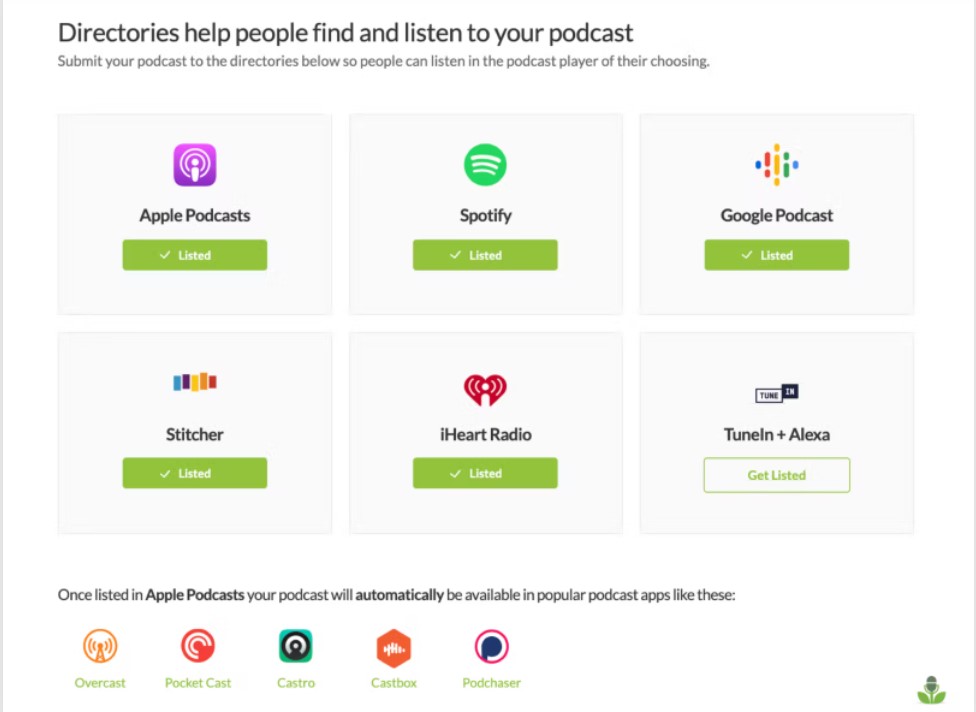
Here’s how to get into Apple Podcasts:
- Log in to Buzzsprout
- Go to the Directories tab
- Click Get Listed under Apple Podcasts
- Log in to Apple Podcasts Connect
- Click Validate
- Click Submit
Here’s how to get into Spotify:
- Login to Buzzsprout
- Go to the Directories tab
- Select Get Listed under Spotify
- Select Submit Podcast to Spotify
Key Points
Learnt about publishing the content using Buzzsprout