Setup
Overview
Time: 10 minObjectives
Install R
Install RStudio
Install Git for Windows (if you are a windows user)
Set up a GitHub Account
Software setup
To follow along you need to set up three things before the workshop:
- Github account (use existing or create new account)
- install Git for Windows (Windows users only)
- install R & RStudio (Two separate installations OR you may use the UIC Virtual Lab)
*NOTE You will not be able to follow along with the hands-on portion of this workshop using the UIC Virtual Lab. You must use the software detailed below through installations on your own computer or on a lab computer.
See instructions below for all three setup requirements and the UIC Virtual lab option:
GitHub Account
You will need an account at GitHub.com.
You can signup for a free Github account at https://github.com/signup.
Through the Github education program,
students get additional free services beyond the basic free account.
If you are concerned about what personal information (specifically contact information) is revealed through GitHub you may review these
instructions
for keeping your email address private provided by GitHub.
Git
Git is a version control system that lets you track who made changes to what when and has options for easily updating a shared or public version of your code on github.com. You will need a supported web browser.
You will need an account at github.com for parts of the Git lesson. Basic GitHub accounts are free. We encourage you to create a GitHub account if you don't have one already. Please consider what personal information you'd like to reveal. For example, you may want to review these instructions for keeping your email address private provided at GitHub.
- Download the Git for Windows installer.
- Run the installer and follow the steps below:
- Click on "Next" four times (two times if you've previously installed Git). You don't need to change anything in the Information, location, components, and start menu screens.
-
From the dropdown menu, "Choosing the default editor used by Git", select "Use the Nano editor by default" (NOTE: you will need to scroll
up to find it) and click on "Next". - On the page that says "Adjusting the name of the initial branch in new repositories", ensure that "Let Git decide" is selected. This will ensure the highest level of compatibility for our lessons.
- Ensure that "Git from the command line and also from 3rd-party software" is selected and click on "Next". (If you don't do this Git Bash will not work properly, requiring you to remove the Git Bash installation, re-run the installer and to select the "Git from the command line and also from 3rd-party software" option.)
- Select "Use bundled OpenSSH".
- Ensure that "Use the native Windows Secure Channel Library" is selected and click on "Next".
- Ensure that "Checkout Windows-style, commit Unix-style line endings" is selected and click on "Next".
- Ensure that "Use Windows' default console window" is selected and click on "Next".
- Ensure that "Default (fast-forward or merge) is selected and click "Next"
- Ensure that "Git Credential Manager" is selected and click on "Next".
- Ensure that "Enable file system caching" is selected and click on "Next".
- Leave all options unchecked on "Configuring experimental options" and click "Next".
- Click on "Install".
- Click on "Finish" or "Next".
This will provide you with both Git and Bash in the Git Bash program.
Video Tutorial
For macOS, install Git for Mac
by downloading and running the most recent "mavericks" installer from
this list.
Because this installer is not signed by the developer, you may have to
right click (control click) on the .pkg file, click Open, and click
Open on the pop up window.
After installing Git, there will not be anything in your /Applications folder,
as Git is a command line program.
For older versions of OS X (10.5-10.8) use the
most recent available installer labelled "snow-leopard"
available here.
Video Tutorial
If Git is not already available on your machine you can try to
install it via your distro's package manager. For Debian/Ubuntu run
sudo apt-get install git and for Fedora run
sudo dnf install git.
R
R is a programming language that is especially powerful for data exploration, visualization, and statistical analysis. To interact with R, we use RStudio.
Install R by downloading and running this .exe file from CRAN. Also, please install the RStudio IDE. Note that if you have separate user and admin accounts, you should run the installers as administrator (right-click on .exe file and select "Run as administrator" instead of double-clicking). Otherwise problems may occur later, for example when installing R packages.
Video Tutorial
Install R by downloading and running this .pkg file from CRAN. Also, please install the RStudio IDE.
Video Tutorial
Instructions for R installation on various Linux platforms (debian,
fedora, redhat, and ubuntu) can be found at
<https://cran.r-project.org/bin/linux/>. These will instruct you to
use your package manager (e.g. for Fedora run
sudo dnf install R and for Debian/Ubuntu, add a ppa
repository and then run sudo apt-get install r-base).
Also, please install the
RStudio IDE.
Install the videoconferencing client
If you haven't used Zoom before, go to the official website to download and install the Zoom client for your computer.
Set up your workspace
Like other Carpentries workshops, you will be learning by "coding along" with the Instructors. To do this, you will need to have both the window for the tool you will be learning about (a terminal, RStudio, your web browser, etc..) and the window for the Zoom video conference client open. In order to see both at once, we recommend using one of the following set up options:
- Two monitors: If you have two monitors, plan to have the tool you are learning up on one monitor and the video conferencing software on the other.
- Two devices: If you don't have two monitors, do you have another device (tablet, smartphone) with a medium to large sized screen? If so, try using the smaller device as your video conference connection and your larger device (laptop or desktop) to follow along with the tool you will be learning about.
- Divide your screen: If you only have one device and one screen, practice having two windows (the video conference program and one of the tools you will be using at the workshop) open together. How can you best fit both on your screen? Will it work better for you to toggle between them using a keyboard shortcut? Try it out in advance to decide what will work best for you.
About the Data Used in this Workshop:
This workshop utilizes the materials found in the following GitHub repository: https://github.com/UCSBCarpentry/R-repro-pub
instructions on how to download and work with these materials will be described in the workshop pages to follow.
Key Points
Install R
Install RStudio
Install Git for Windows (if you are a windows user)
Set up a GitHub Account
Good Practices for Managing Projects in RStudio
Overview
Time: 30 minObjectives
Best pratices for working on research projects involving data.
The purpose of using .Rproj files.
Using version control in RStudio.
Starting or continuing an R project.
Managing Research Projects in R
Now that we’ve learned some of the basics of authoring in RStudio with R Markdown documents, let’s take a step back and talk about research project management as a whole.
The ability to integrate code and narratives is a major advantage of the RStudio environment, especially considering the scientific process is naturally incremental, and many projects start life as random notes, some code, then a manuscript, and eventually everything ends up a bit mixed together. To complicate things further, we are often working with other collaborators, lab members, graduate students, faculty from the same or different institutions, which makes it that much more difficult to keep projects organized. When you throw data into the mix (sometimes huge amounts of it!), it’s integral to use best practices to maintain the integrity of your analysis and to be able to publish high quality and reproducible research. Using R Markdown is a powerful tool, but it can’t be fully utilized unless your project documents, scripts and other files are well-organized. So let’s take a look at RStudio’s features to manage projects and discuss some of the best practices when working with data and collaborators.
Research Project Stress Points
We often have organizational or logistical stress points in our research that may become breaking points, especially when it comes to working with collaborators, returning to a project after a hiatus, or dealing with data and scripts. Let’s discuss three of those common stress points:
- File/folder disorganization
- You cannot find your files on your computer (or your cloud storage)
- Multiple versions of files with names such as “finaldraft_4.txt”
- Path issues when trying to run code
- Reviewers or colleagues cannot re-run your code/analyses
- Storage and sharing issues
- Files are only saved to your computer and are vulnerable (or have already succumbed to computer/hard drive failure
- When working with collaborators, they (or you) don’t share the files needed
- Files are shared via email attachments
- Difficult to know if you have the latest version of documents
- Losing track of project status
- You cannot remember where you are in a project after being away for an extended period (or what you worked on the previous day…no judgement)
- You aren’t sure what you should be working on next
- You have various to-do notes spread across your office or home (or never write them down in the first place)
Discussion
To what extent do these stress points affect your research projects? Are there additional issues that you’ve encountered that slow down or derail your work due to issues with project management?
Discussion: Antidotes
What are some practices you implement to keep your project materials organized?
Antidotes
A good project layout will ultimately make your life easier:
- It will help ensure the integrity of your data
- It makes it simpler to share your code with someone else (a lab-mate, collaborator, advisor etc.)
- It allows you to easily upload your code with your manuscript submission
- It makes it easier to pick the project back up after a break.
- It makes your research reproducible!
We’ll discuss three aspects of project management and then implement those practices for the remainder of this workshop in the RStudio environment.
- File/Folder Organization
- Storage & Sharing
- Using Version Control
Then, we’ll get started on our project!
Project File/Folder Organization
Important principles:
Although there is no “best” way to lay out a project, there are some general principles to adhere to that will make project management easier:
Practice good file-organization
Good Enough Practices for Scientific Computing gives the following recommendations for project organization:
- Put each project in its own directory, which is named after the project.
- Put text documents associated with the project in the doc directory.
- Put raw data and metadata in the data directory, and files generated during cleanup and analysis in a results directory.
- Put source for the project’s scripts and programs in the src directory, and programs brought in from elsewhere or compiled locally in the bin directory.
- Name all files to reflect their content or function.
- Additionally, we’d recommend to include README, LICENSE, and CITATION files!
For our project we’re working in today, we used the following setup for folders and files:
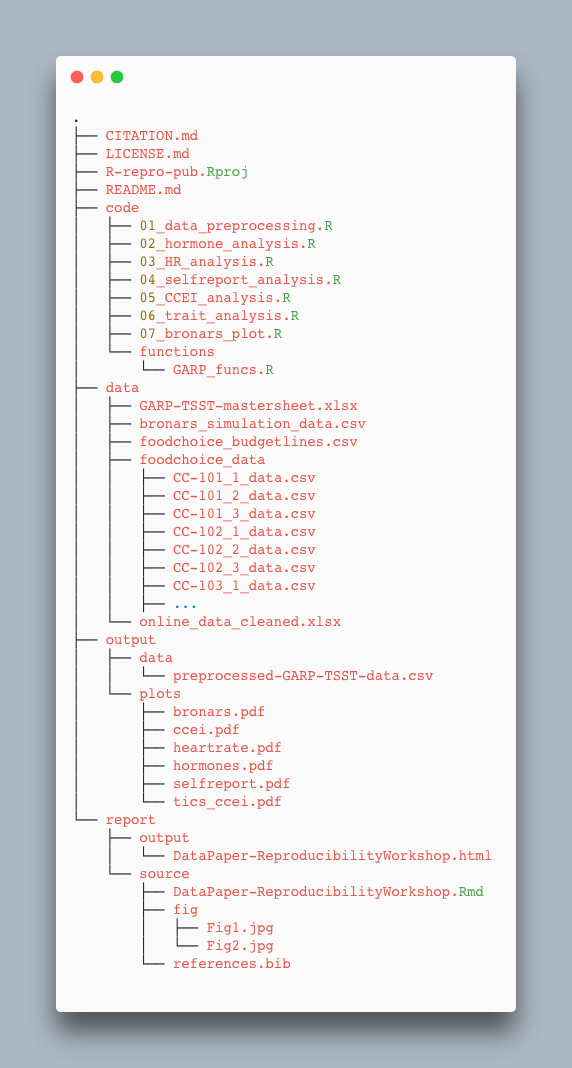
Exercise: Take a few minutes to look through the workshop project files
Please take some time to look through the project files. Either the screenshot above, or you may browse the files on GitHub at https://github.com/UCSBCarpentry/R-repro-pub. What do each of the directories (folders) contain? What is their purpose?
See the solution drop-down for an explanation of each directory’s contents.
Solution:
- code: contains the scripts that generate the plots and analysis (found in
output/plots)
- /functions: contains custom functions written for the data pre-processing
- data: this folder contains the raw and cleaned data files
- /foodchoice_data: contains the individual data files from food choice trials
- output: contains processed/transformed data and all plots generated
- /data: contains the output data file after applying custom pre-processing function
- /plots: contains pdfs of the plots generated from the plot scripts in the code folder
- report: all files needed for the publication of the research project
- /source: .Rmd file for the paper and additional files needed for rendering the paper
- /fig: contains the images created specifically (not through the analysis scripts) for the paper
- /output: contains the final output of the Rmd paper
- R-repro-pub.Rproj: the R project file that lives in the root directory.
- README.md: a detailed project description with all collaborators listed.
- CITATION.md: directions to cite the project.
- LICENSE.md: instructions on how the project or any components can be reused.
Practice good file-naming
The three principles of file-naming are:
- Machine-readable
- Friendly for searching (using regular expressions/globbing)
- No spaces, unsupported punctuation, accented characters, or case-sensitive file names
- Friendly for computing
- Deliberate use of delimiters (i.e. for splitting file names) data-analyses-fig1.Rwith-used consistently as a separator
- Human-readable
- Name contains brief description of content
- Borrow from clean URL practices:
- “slug” i.e. the part of a url that is human readable
- i.e.
data-analyses-fig1.R
- Plays nice with default ordering
- Use chronological or logical order:
- chronological: filename starts with date.
- i.e.
2022-01-01_data_analyses.R - Use ISO 8601 date standard
- i.e.
- logical: filename starts with a number or keyword/number combo.
- i.e.
01_data_preprocessing.Rsee code directory - i.e.
CC-101_1_data.csvsee data directory
- i.e.
Adapted from https://datacarpentry.org/rr-organization1/01-file-naming/index.html. For more tips on file naming, check: The Dos and Don’ts of File Naming.
Challenge: File name syntax
Given the filename
CC-101_1_data.csvand2022-01-01_data_analyses.R, why does it make sense to use both-and_as delimiters/separators?Solution:
In
CC-101_1_data.csv, the-is used as part of the keyword that is shared between a number of files. the_separates it from the trial number and description. If one were to split the filename on the_, the keyword would be maintained and the trial number would be separated out. In the2022-01-01_data_analyses.R,-is used for a delimiter for the date, between year month and day._is used between the rest. This allows us to split on_which would preserve the date (separate from other file info).It’s good to strategize on the best way to name files to anticipate future uses of the information contained within the filename.
Use relative paths
This goes hand-in-hand with keeping your project within one “root” directory. If you use complete paths to say, read in your data to RStudio and then share your code with a collaborator, they won’t be able to run it because the complete path you used is unique to your system and they will receive an error that the file is not found. That is why one should always use relative paths to link to other files in the project. I.e. “where is my data file in relation to the script I’m reading the data into?” The practice of using relative paths is made easier by having a logical directory set up and keeping all project files within one root project folder.
Assuming your R script is in a code directory and your data file is in a data directory then
an example of a relative path to read your data would be:
df <- read.csv("../data/foodchoice_budgetlines.csv", encoding = "UTF-8")
whereas a complete path might look like:
df <- read.csv("C:/users/flintstone/wilma/Desktop/project23/data/foodchoice_budgetlines.csv", encoding = "UTF-8")
In the complete path example you can see that the code is not going to be portable. If someone other than Wilma Flintstone wanted to run the r script they would have to alter the path to match their system.
Challenge: relative path
What would be the relative path needed to refer to the
bronars.pdfplot (located in the plots directory) fromR-repro-pub.Rproj(located in the root directory). What is the inversed relative path?Solution:
R-repro-pub.Rprojtobronars.pdf“output/plot/bronars.pdf”
bronars.pdftoR-repro-pub.Rproj“../..” “..” directs back to the directory that contains the directory of the file of interest.
Treat data as read only
This is probably the most important goal of setting up a project. Data is typically time consuming and/or expensive to collect. Working with them interactively (e.g., in Excel or R) where they can be modified means you are never sure of where the data came from, or how it has been modified since collection. It is therefore a good idea to treat your data as “read-only”. However, in many cases your data will be “dirty”: it will need significant preprocessing to get into a format R (or any other programming language) will find useful. Storing these scripts in a separate folder, and creating a second “read-only” data folder to hold the “cleaned” data sets can prevent confusion between the two sets. You should have separate folders for each: raw data, code, and output data/analyses. You wouldn’t mix your clean laundry with your dirty laundry, right?
Treat generated output as disposable
Anything generated by your scripts should be treated as disposable: it should all be able to be regenerated from your scripts. There are lots of different ways to manage this output. Having an output folder with different sub-directories for each separate analysis makes it easier later. Since many analyses are exploratory and don’t end up being used in the final project, and some of the analyses get shared between projects.
Include a README file
For more information about the README file and a customizable template, check this handout. Make sure to include citation and license information both for your data see creative commons license and software (see license types on Github). This information will be critical for others to reuse and correctly attribute your work. You may also consider adding a separate citation and license file to your project folder.
Again, there are no hard and fast rules here, but remember, it is important at least to keep your raw data files separate and to make sure they don’t get overridden after you use a script to clean your data. It’s also very helpful to keep the different files generated by your analysis organized in a folder.
*what’s this .Rproj file? We’ll explain in a bit.
Storage and Sharing
Backup your work
Having a solid backup plan in case of emergencies (say your hard drive on your computer fails) is essential. The general guideline for back ups is to adhere to the 3-2-1 principal which dictates that you should have 3 copies, on 2 different media, with 1 copy offsite. Your decision on backups will be based on your own personal tolerance but we recommend at minimum to avoid only having a copy of your project on your personal, work computer or a lab computer at all costs.
At the very least, you should backup your project into cloud storage (either provided by your university or paid for yourself). Common cloud storage platforms include Google drive, Box, OneDrive, Dropbox, etc. Backing up a project on a local device to cloud storage allows you to meet two of the 3-2-1 criteria (2 different media and 1 offsite). If you’re working with at least one collaborator and they also keep an up-to-date copy of the project on their computer, you’re set!
Version Control hosting services
If your research project involves code, the best way to make sure you have your work backed up AND keep track of your code and data is to use a version control hosting service such as GitHub - though we’d recommend using version control for any large projects.
The main three version control hosting services are GitHub, GitLab, and BitBucket, to see a comparison of the available options, see this comparison on LinkedIn
We will proceed using GitHub because it is the most used version control platform to date.
Using Version Control
Ok, now let’s talk about implementing version control in your project through RStudio! But first… let’s quickly clarify the difference between Git and GitHub. We already said that GitHub is the version control hosting platform. Git is the version control system and does not have to be used with GitHub. You can use Git and then host your code on Bitbucket for example, or save to your Google drive. In fact, you can use Git on your local system only and never save it to a cloud storage platform. However, version control hosting platforms such as GitHub enhance the benefits of version control and offer incredible collaboration features. The difference between the two can be a bit confusing because they are so often used together, but the more you use them the more it will make sense. Soon enough you’ll be wondering how you even completed a code project without version control.
There are actually many ways to use Git, you could use it on GitHub only (though that suffers from lack of options and is a bit clunky), there is a Desktop interface, many serious programmers use it on command line. HOWEVER, RStudio has Git controls built in so we’ll use it there - all in one place!
Before we use Git in RStudio project, we must have an R Projects file (.RProj) so let’s talk about how R Projects works in RStudio.
Who has used R Projects before?
Working in R Projects
One of the most powerful and useful aspects of RStudio is its project management functionality. We’ll be using an R project today to complement our R Markdown document and bundle all the files needed for our paper into one self-contained, reproducible bundle. An .Rproj file helps keep your R scripts, data and other files together - just navigate through your file system to get to your project directory and double click on the .Rproj file. The added benefit is that the .RProj file will automatically open RStudio and start your R session in the same directory as the .Rproj file and remember exactly where you left off. .RProj files are powerful ways to stay organized on their own, but they also unlock the additional benefit of being able to use Git within RStudio.
Tip: R Project in “root” folder
.Rprojfiles must be in the root directory of your project folder/directory. What is the root directory again (look back at the relative paths intro)?
Key Points
Use best practices for file and folder organization. This includes using relative file paths as opposed to complete file paths.
Make sure that all data are backed up on multiple devices and that you treat raw data as read-only.
We can use Git and Github to keep track of what we’ve done in the past, and what we plan to do in the future.
Rproj files are pivotal to keeping everything bundled and organized.
Getting Your project set up with Version Control in RStudio
Overview
Time: 30 minObjectives
Copy an existing project on Github to make contributions
Open a project with Git versioning in RStudio
Learn the basics of Git - pull, add, commit, push
Make our first edits in a verison controlled project
Using R projects and Version Control in RStudio
It’s a two step process to work on a project in RStudio with version control. First step is to make sure your work is set up as an R Project. Secondly, and optionally, when you set up your project you can have the option to add versioning (or continue from an existing version-controlled project).
Starting an R Project
There are several options for working with R projects in RStudio. If you aren’t already working in an R Project, you can create a new one. There are three options here:
- New Directory - start a brand new R project.
- Existing Directory - add exisiting work to a R project.
- Version Control Continue an existing R project that already uses version control (i.e. download from GitHub).
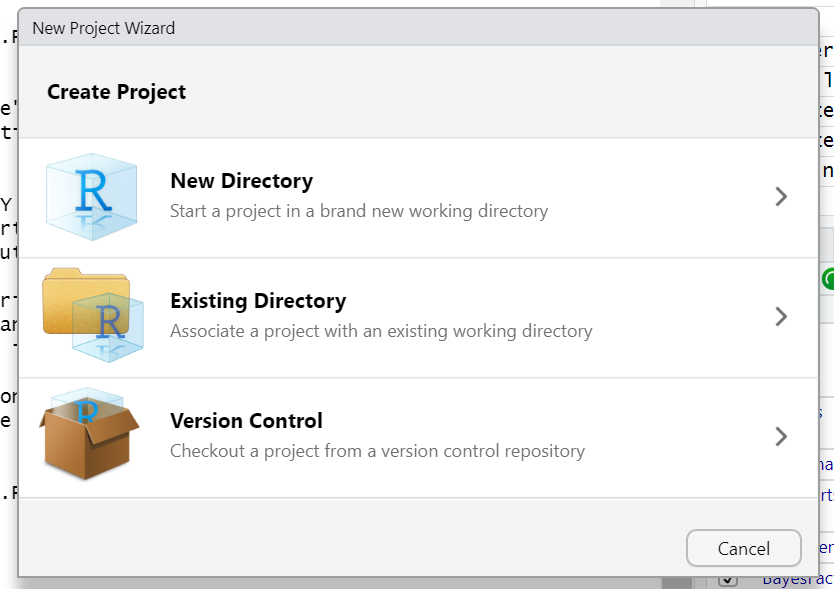
The third option would be a project already under version control but options 1 and 2 will also give you the opportunity to use or add versioning to the project. Let’s see how that would work.
Starting a R Project with Version Control
To start an R project, you would navigate to File > new project rather than just File > new file.

After choosing New Directory chose new project on the next menu options.
Then, to use version control, make sure to check the “Create a git repository” box as highlighted in this screen shot:
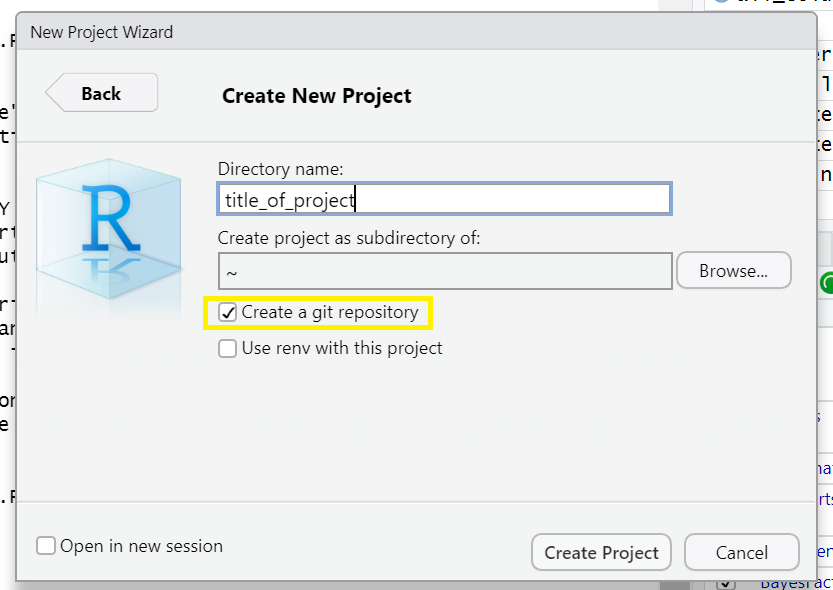
*Note when you choose directory name, it will create a new directory in the directory you specified along with an .Rproj file of the same name. Avoid spaces here. underscores “_”, dashes “-“ or camel case “NewProject” is the recommended way to name this directory/file.
*Optionally, check the box in the bottom left corner “Open in new session” if you want it to appear in a new RStudio window.
Add versioning to an existing project

We won’t take the time to cover this here, but if you’ve already started an R project WITHOUT version control, you have the option to add version control retrospectively. You can also add existing R files to a project and version control if you’ve done neither. To see a tutorial of this process, please see episode 14 “Using Git from RStudio” in Version Control with Git.
This is by far the most labor intensive way to do it, so remember to add version control at the beginning of any new project (even if you get lazy and don’t end up using it).
Continue a version-controlled project
 The final option is to continue a version controlled project. This is the option we will do for our workshop.
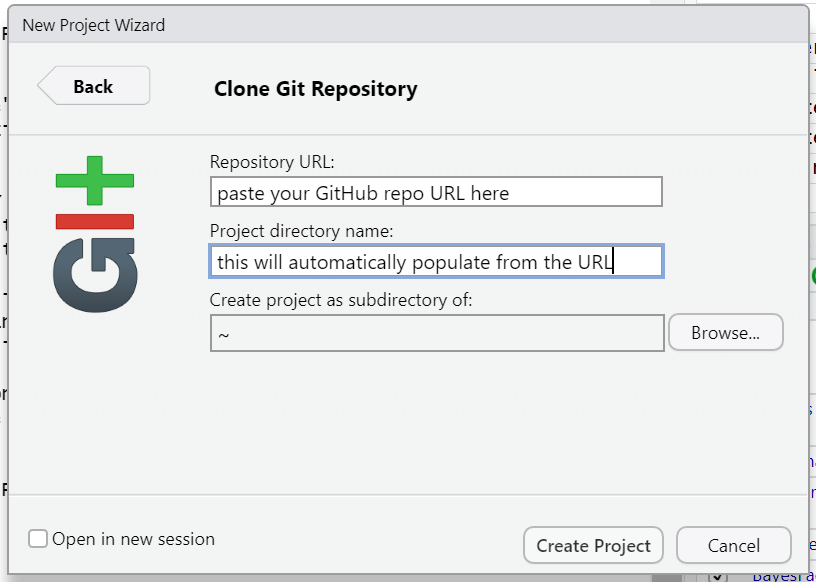
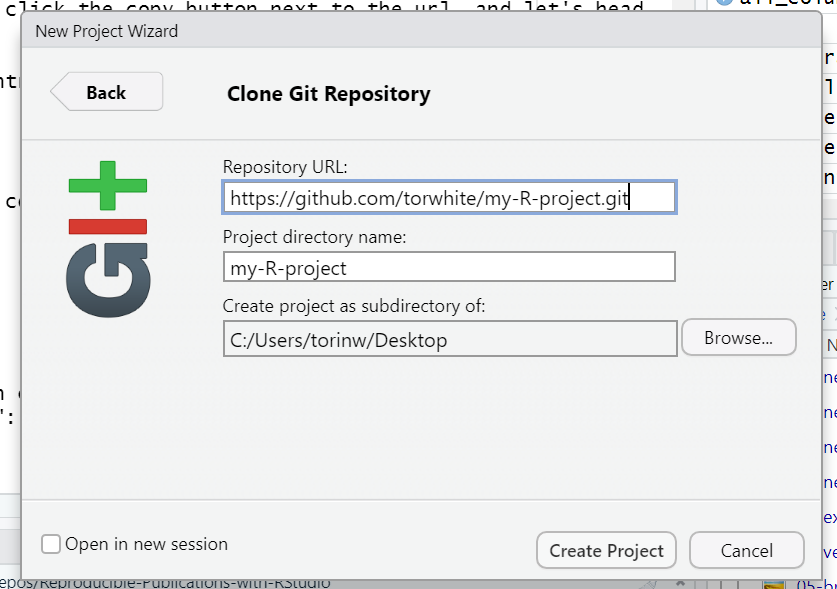
First, indicate which version control language you will be using (Subversion is another less popular language than Git)
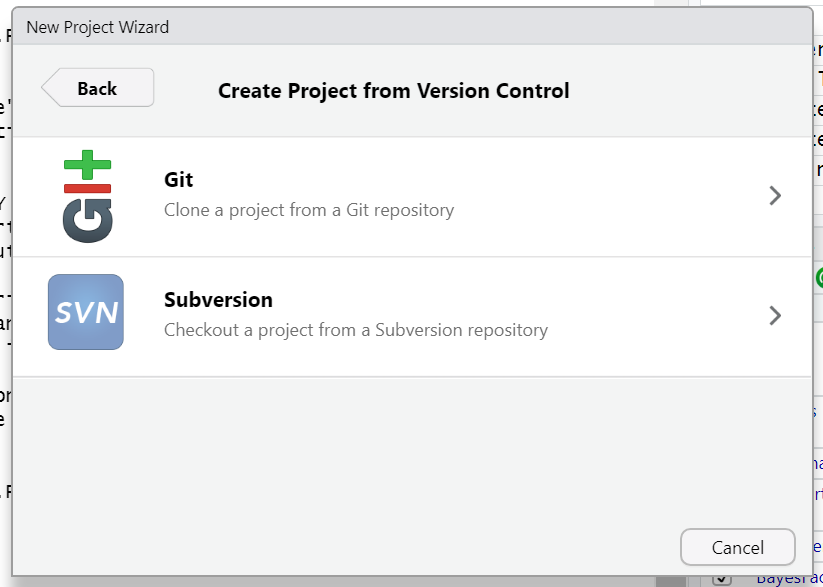
When you choose this option there will be a place to paste the url of the GitHub (or other hosting platform) url. The name of the repository will automatically populate. Just choose which directory on your computer you wish to save the project directory and your good to go!
Our turn!
We have a repository already prepared for this workshop at https://github.com/UCSBCarpentry/R-repro-pub We are going to use the third option to download a repository from GitHub to work hands on.
Let’s take a second to acquaint ourselves with GitHub. At this link, you may sign into your GitHub account or create one if you have not already.
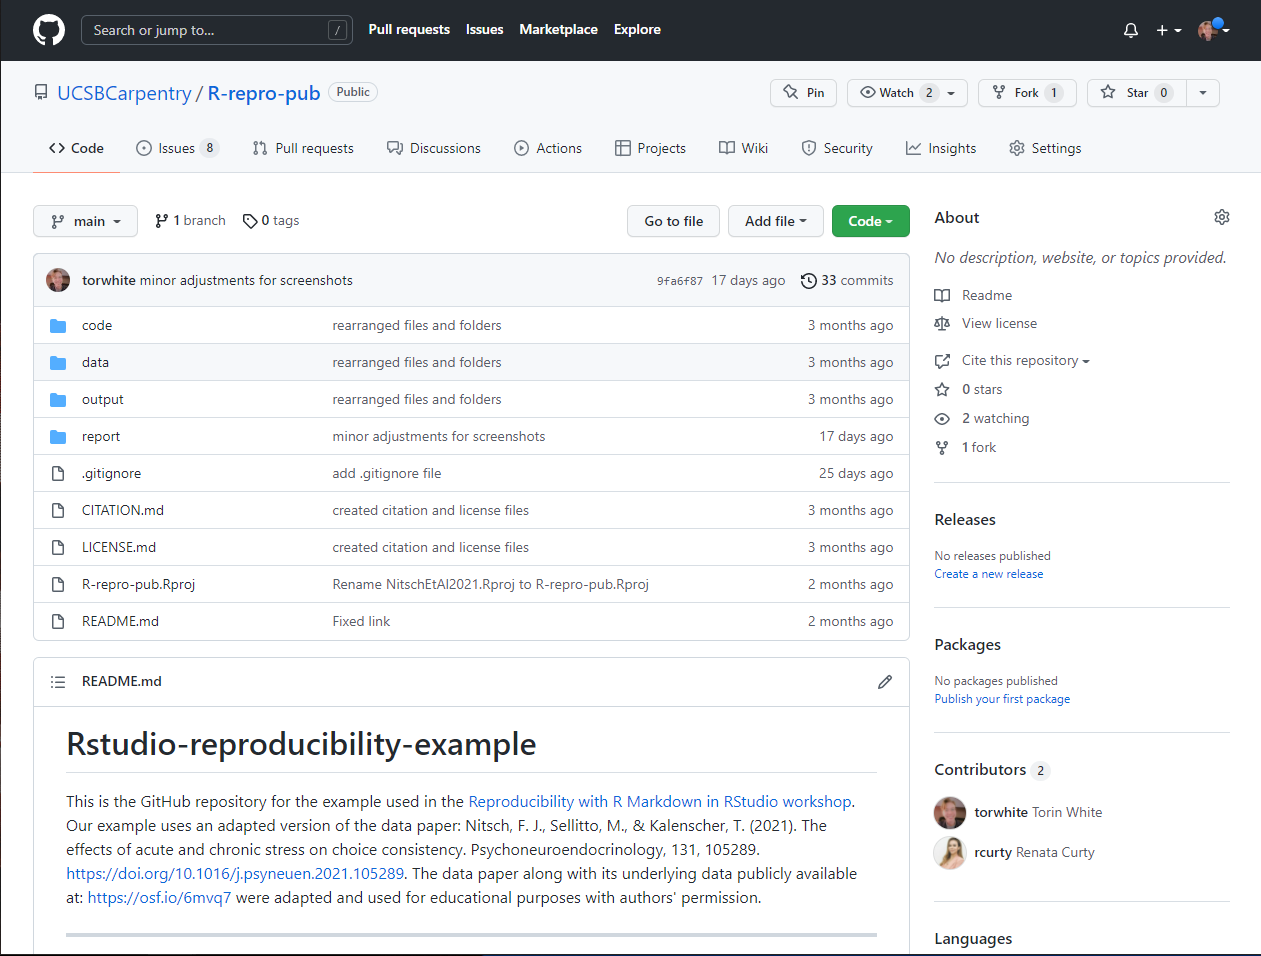
The two main sections are files and directories and the README which should contain a narrative description of the project.
We are each going to make a copy of this repository to use for this workshop. To do so we will do what’s called “forking” on GitHub. A Fork is a copy of a repository that you get to experiment with without disrupting the original project.
In the upper right hand corner of the repository, click on the button that says “Fork” - see highlighted example below:
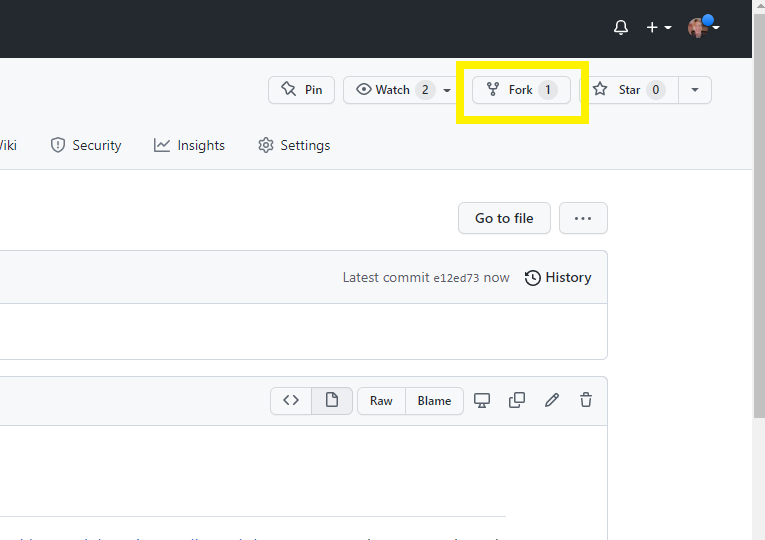
If you are a member of any organizations on GitHub, you will be asked whether you want to fork to your account or to an organization. Choose your personal account for this workshop. GitHub will process for a few moments and voila! You have a copy of the workshop repository.
Now, click on the green Code drop-down and then click on the copy icon next to the repository url:
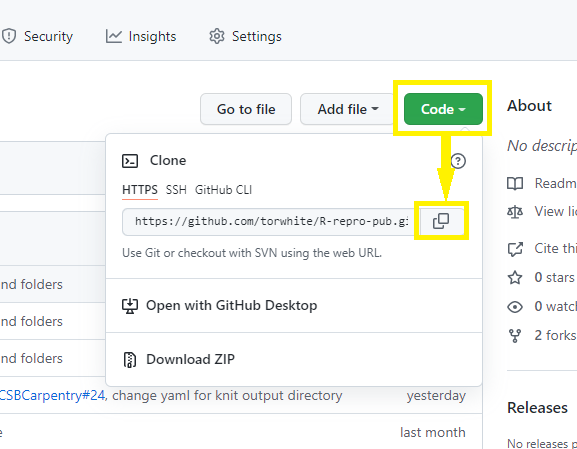
Now, let’s return to RStudio:
Click File>New Project > Verison Control > Git.
Ok, so if you are using Git for the first time in RStudio at this point you may be getting a notification that Git isn’t set up to work with RStudio.
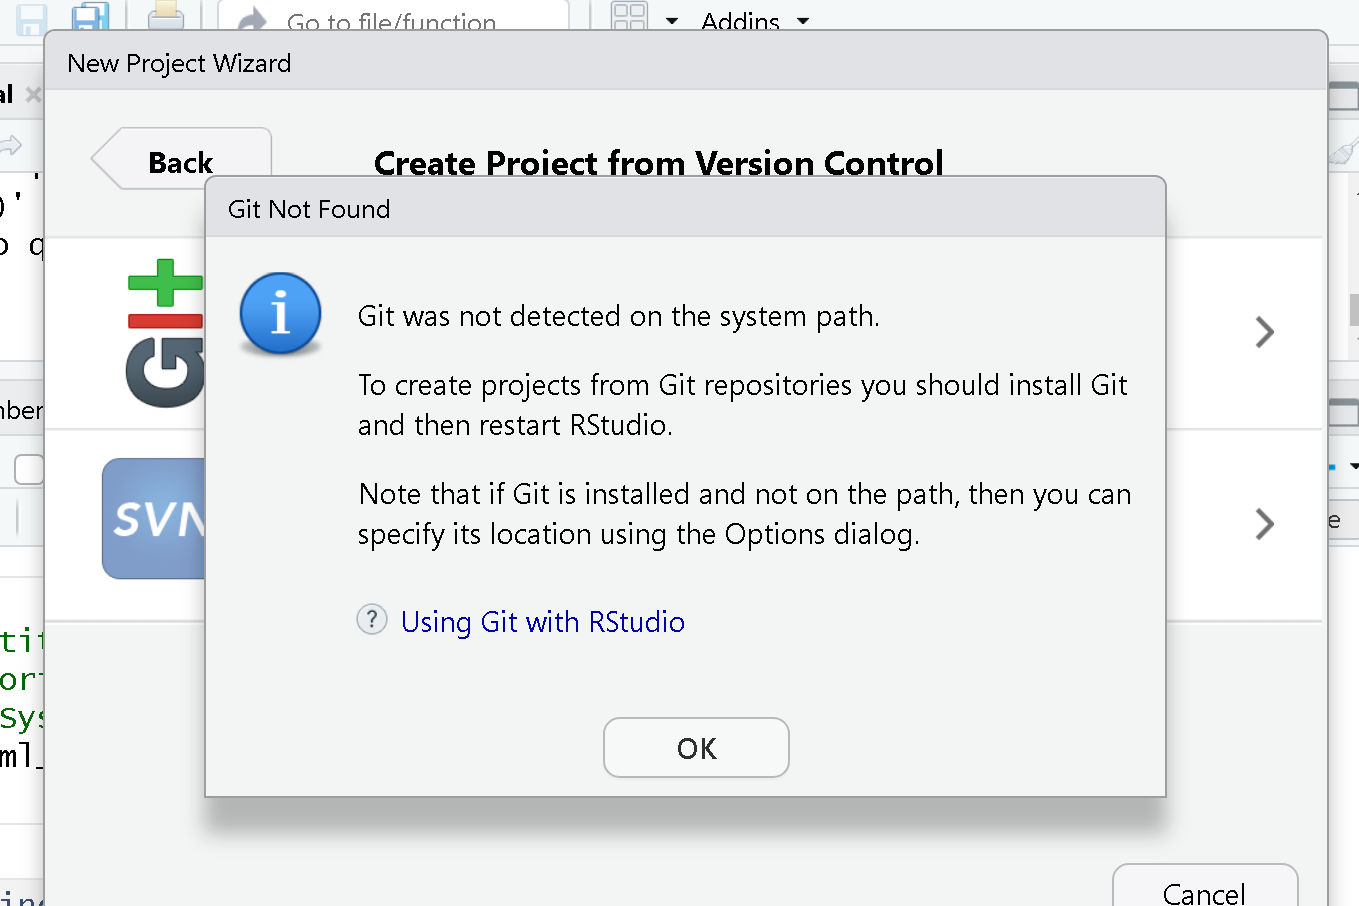
To set it up we need to go to Tools > Global Options
First, make sure “Enable version control interface for RStudio projects” is checkd. Next, you must make sure that the Git executable path is correct.
For macs, more than likely the path will have automatically populated. In all likelihood that path is /usr/bin/git. Windows users may find that the correct path is also pre-populated, but it is likely that you may need to manually add it by clicking “browse”. More than likely your path will be something like C:/Program Files/Git/bin/git.exe. If not, search for where Git for Windows was installed (Git) go into the bin folder and select the ‘git.exe` file.
Ok! Now that we set that up (by the way, this is a one time set up -it will work now for all future projects in RStudio on your device), we should be able to open our project from GitHub in RStudio.
So back to the url you copied from GitHub. Navigate again to File > New Project > Version Control > Git. Paste in your url and choose “Desktop” as your directory.
Woo hoo! We have the project we’re working on for this workshop opened in RStudio and set to use version control!
Now, let’s dive in to how to use version control.
Using Version Control in RStudio
There are two places we can interact with Git in the RStudio interface.
- Menu bar

- Environment/History pane
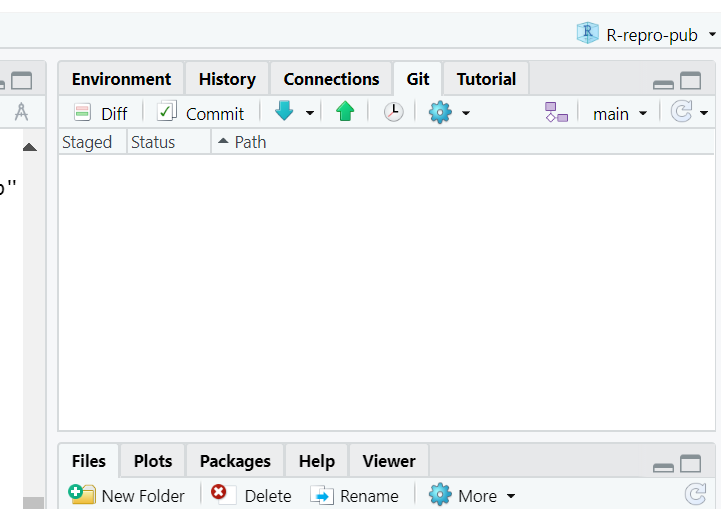
Ok, but what do all the options mean? We won’t go through them all, but here are the basics to get started versioning your project.
Git Workflow
The most simple workflow for version control (working on your computer only) is referred to as “add” and “commit”:
But what do those words even mean?
add: choose a file or files to take a “snapshot” of. Aka what files do you want to add to your next version?
Commit: Taking a “snapshot” of a selected version of your project. The snapshot will only include the files you “added”, typically only files that you’ve edited since your last commit.
You may have a few to many commits in a single work session.
When you commit, you add a “commit message” aka a short line of text (recommended 50 characters or less) that describes the changes that were made to the file(s) you added. This helps keep your versions organized and makes it easier to go back to remember what you did or to restore your work to exactly the version needed if you make a mistake or want to implement a change.

Git Workflow with GitHub
If we are saving our work to a version control hosting cloud platform such as GitHub, our workflow gets a bit more complex, we add a “pull” and “push” step at the beginning and end of a work session.
Pull > add > commit > push
Pull: download the most recent version of the repository from GitHub to your local computer.
Push: upload the most recent version of the repository to GitHub from your local computer.
Put a pin in pulling and pushing for now. For the time being as we edit our paper we will just stick to adding and commiting. At the end we’ll see how to use push to GitHub, and you can experiment with pulling later on.
Tips for working with Git
- You should pull each time you start working on your project after a hiatus, or before each edit if you know a team member is working at the same time.
- Commit frequently, each commit should be a distinct set of edits which you can summarize in 50 characters or less. Don’t add a bunch of unrelated edits to the same commit, it makes it harder to look back through your “snapshots” and find the right one if you need to.
- At the end of your work session (or more frequently if you are working at the same time as team members), “push” your commits to the remote repository - this is the only way your local changes get added to your team’s remote repository.
This pull, add, commit, push routine will become second nature. Pulling at the beginning and pushing at the end of your work session becomes a sort of ritual that marks the beginning and end of your work session.
Tip: add files that don’t need to be tracked to the .gitignore
Such as data files, outputs, references (you want to save those, but you aren’t actively making changes to them so we don’t need to “track” them through version control. Mostly scripts and rmd files need tracking
Discussion: (optional) Using .gitignore files
a
.gitignorefile is used to signal to Git to NOT keep track of versions of the files included in the folder. Once instance where this is used in a data analysis project is with data files.Now, there are some caveats to this, so in what situations would it make sense to add data to the .gitignore and what situations would it not?
Solution:
Why and when would it be a good idea to add data files to the
.gitignore?
- With raw data files - since they will not be modified (remember: raw data = read only).
- With sensitive data - This should absolutely not be pushed to GitHub
Why and when would it not make sense to add data files to the
.gitignoreso they will be available in the Git repository.
- pre-processed data files - these are the data files that are edited - processed from the raw data
- small data files - may not make much of a difference whether they are tracked or not
- the first time you add data files - You can’t push data files to GitHub unless
Challenge: (optional) Add the files/directories to .gitignore
Add the data (all of the raw data files) to the
.gitignore.
Hint: there are two ways to do this.
Hint2: add a forward slash/after directories.Solution:
1) open the .gitignore file by double-clicking on it in the file view pane, on a new line add
data/. Save the file and don’t forget to commit it.2) Click on the settings gear in the Git tab of the environment pane. Click on
gitignore. On a new line adddataand click save. Don’t forget to commit the.gitignorefile.

Your first edit
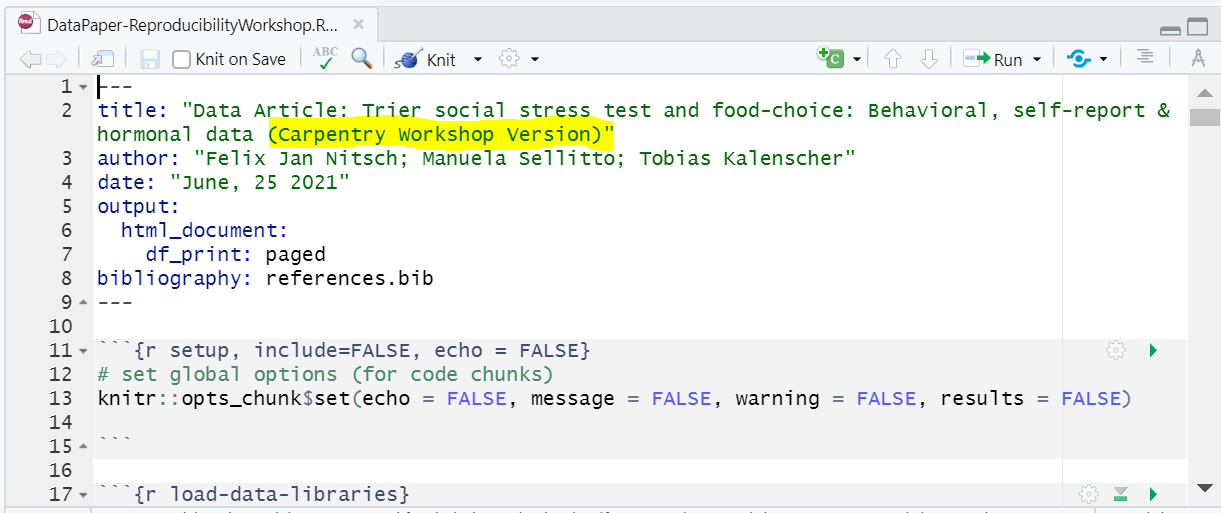
Now, let’s open up the report in this repository that’s already been drafted. The R Markdown document for the report is located in report/source. It is called: DataPaper-ReproducibilityWorkshop.rmd The first edit we will make is to the yaml file of this draft report so we can practice using version control.
In the title add “(Carpentry Workshop Version)” and make sure to save.
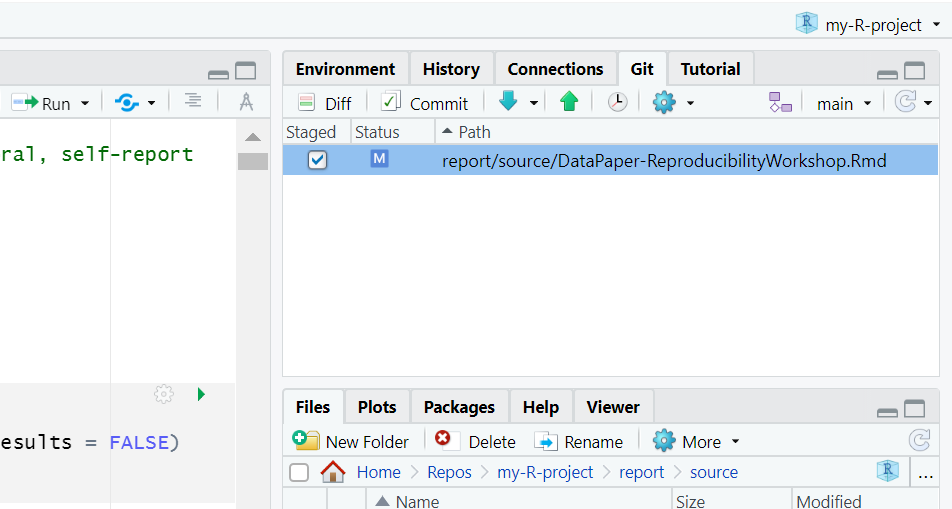
Now, in the Environment panel, toggle to the Git tab. You’ll see the file that was edited with a check mark next to it. Click the check mark to “add” . Note that if you edited more than one file you could choose any or all of the documents to “add”.
Now, click commit. A dialogue box will pop up. You’ll need to add a commit message to proceed. Add something about editing the title. The difference between your files will show in the bottom panel.
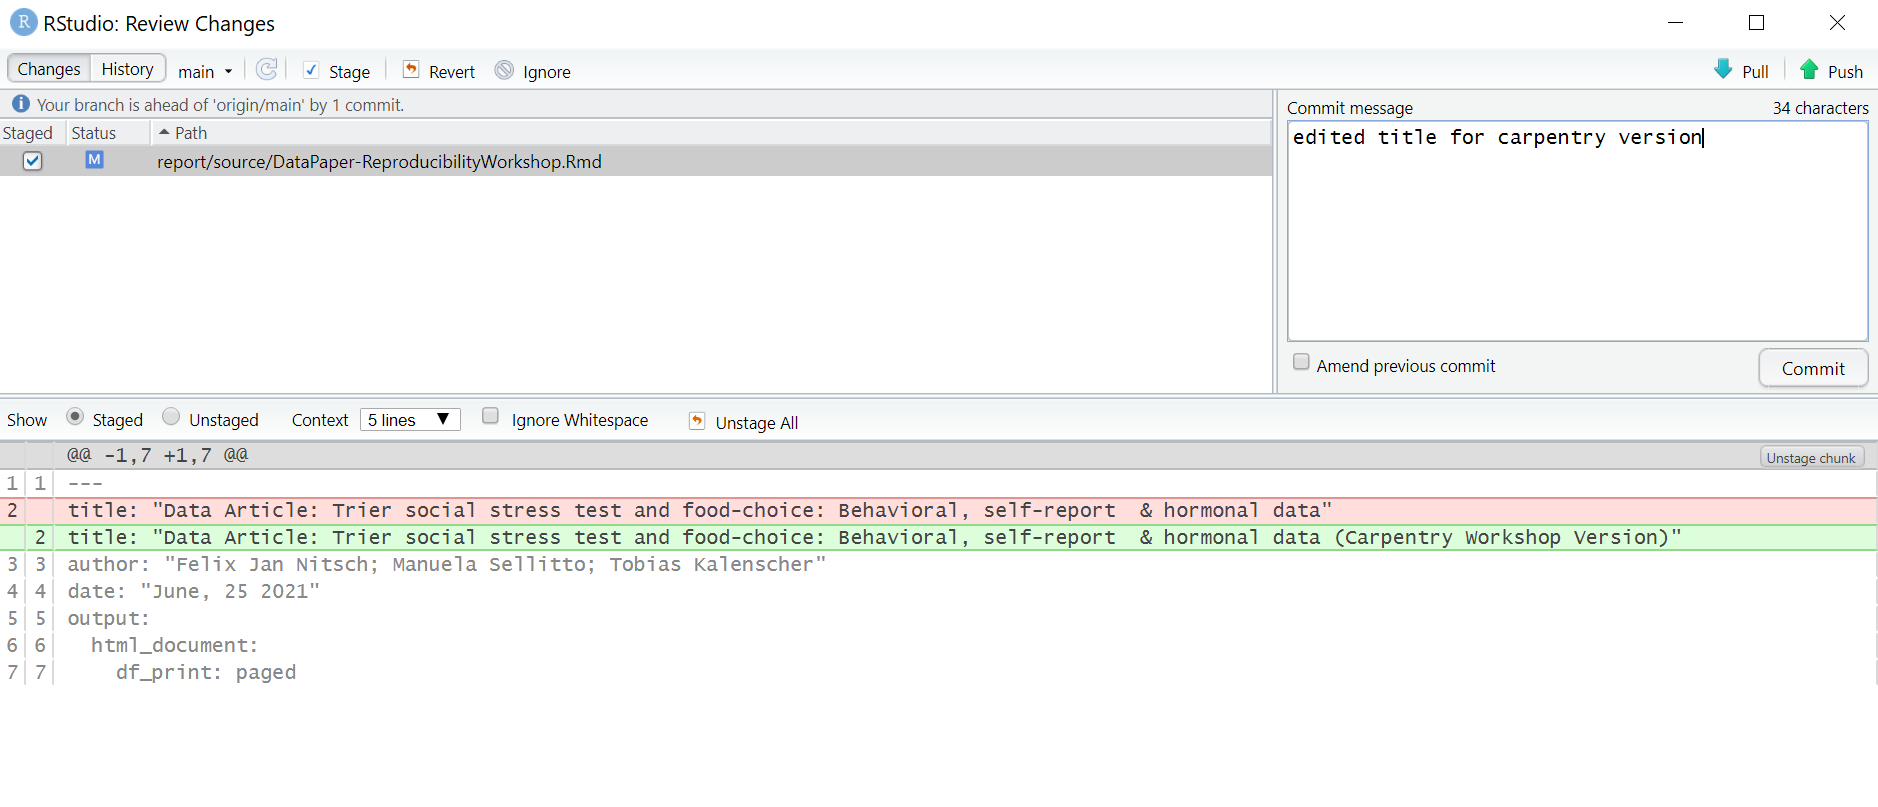
Hit commit and a dialogue box will show a completed commit.
You made your first commit!
Key Points
R Studio has Git version control functionality built in.
Forking a Github repository makes a copy of the repository into your personal account on Github.
You can clone a git repository from Github to your local disk using R Studio.
For this workshop each learner will work with their own fork of the “R-Repro-pub” repository.
Writing and Styling Rmd Documents
Overview
Time: 10 minObjectives
Learn how to enable the visual editor.
Get familiar with its basic functionalities.
Apply rmd formatting and styling using the visual editor.
Learn how to add inline code to your rdm document.
Formatting Rmd Documents with the Visual Editor
As we mentioned earlier, the visual editor in RStudio has made R Markdown formatting much more effortless. It provides improved productivity for composing longer-form articles and analyses with R Markdown. The visual markdown editing is available in RStudio v1.4 or higher. Markdown documents can be edited in either source or visual mode. To switch into visual mode for a given document, toggle on the compass icon at the top-right of the document toolbar (alternatively for windows, the ⌘⇧ F4 keyboard shortcut). This will prompt a formatting bar through which you can apply styling, add links, create tables, and others similar to functions you find in google docs and other document editors. Note that you can switch between source and visual mode at any time (editing location and undo/redo state will be preserved when you switch). Let’s try it! Feel free to follow along or just watch this quick demo. But first, make sure to have your visual editor enabled on your screen. Also, make sure to open your DataPaper-ReproducibilityWorkshop.Rmd file located at the report\source folder
Editor Toolbar
The editor toolbar includes buttons for the most commonly used formatting commands:

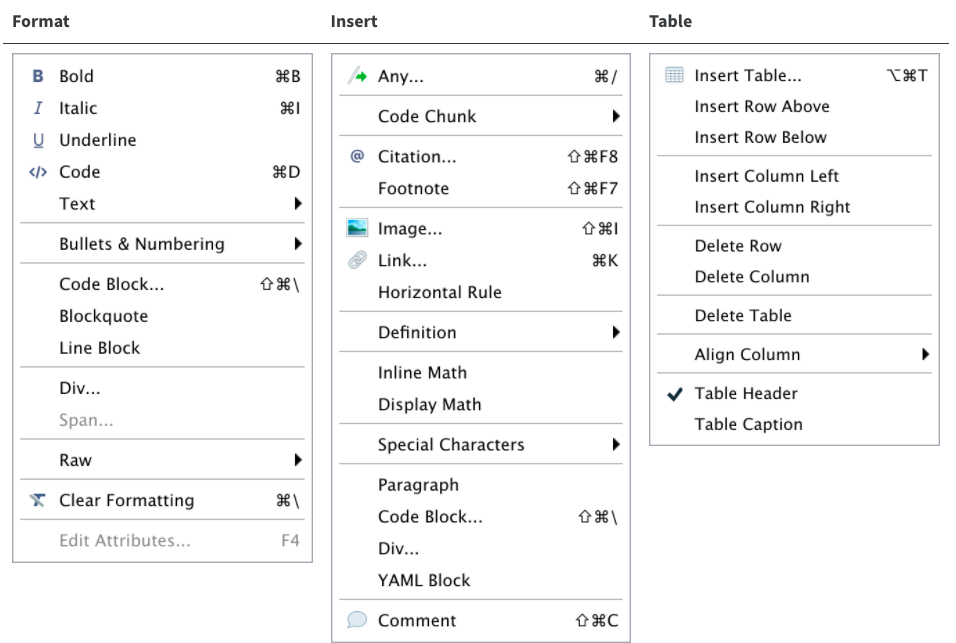
Additional commands are available on the Format, Insert, and Table menus:
Tip: Inserting anything with shortcuts
You can also use the catch-all ⌘ / shortcut to insert just about anything. Just execute the shortcut then type what you want to insert. For example:
/liswill prompt listing options.
Applying Emphasis
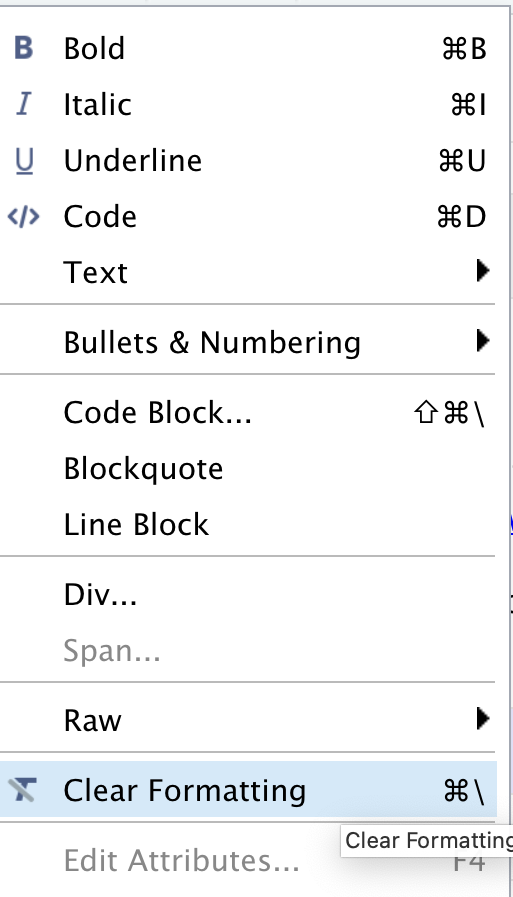
At the very top of the document we have a recommended citation for the sample data paper (FIXME1). We want to emphasize the title of the journal, “Data in brief” in italics. Select the text and click in the I icon and voilà! Remember to delete (FIXME1).
Adding Links
In the same citation we have just worked on, let’s now add a link to it by selecting and copying the doi address (FIXME2). Then, click on the link icon and paste the address in the URL field. Simple right? If you prefer, you can also the drop-down insert menu, or even use shortcuts. By hovering the mouse over the desired icon, you will see which keys you should use. For a complete list of editing shortcuts, check this link. Tip: if you didn’t intend to use a shortcut and want to reverse its effect, just press the backspace key.
Adding Headings
Adding headings to a R Markdown document in Rstudio is as simple as applying links. Let’s say we want the abstract section as a Heading Level 2. We can select the “abstract” then, and under “Normal” on the left-hand side of the menu, we can choose the desired level. Again, all the shortcuts will be listed next to the styling in the menu. Now apply the same heading to keywords and Level 2 to “Specification Table” (FIXME3).
Creating Tables
Because creating tables manually in Rmd documents could be a little painful for beginners, Rstudio released an add-in functionality for tables back in 2018. The new visual editor, however, have made the process to create rmd tables more similar to other editors we use daily. In our template, we have the specification table with 10 rows and two columns. If we were willing to add that table, we could do that by inserting a table to a selected part of the documents and by specifying the desired number of rows and columns. Including a caption is optional, but recommended. We can add or delete rows and columns, add a header that will be set bold by default but can be changed, and set the desired alignment. Select the desired text and click on the crossed T icon if you wish to clear formatting.
Creating Bullet and Numbered Lists
Again, similarly to other document editors, Rstudio allows you to turn text into bullet or numbered lists. Let’s apply a bullet list to the paragraphs specifying the “Values of the Data” reported in the data paper (FIXME4). Assuming we were willing to create a numbered list instead, we could have followed the same process and chosen the other icon. We can also sink or lift the listed items.
Adding Images
You may need to include static images to your manuscripts. For that, you can use the insert image function, click on the painting icon or even use the shortcut that shows right next to the function in the menu. After browsing and upload the desired image you may also specify the caption and the image title, as well as adjust dimensions if needed. Let’s insert two images Fig. 1 (FIXME5) and Fig. 2 (FIXME6).
Adding Formulas
If you have math formula in your manuscript there are three different ways you may insert one. Let’s look for (FIXME7) for an example. Point and click at the insert menu, use the catch-all ⌘ / keyboard short and then get to inline math mode, or type the formula content between dollar signs $. You will notice that the color and font type will change, as Rstudio identifies the block as an inline equation.
Adding Inline Code
You can also include r code directly in your text. Say you are discussing some of the summary statistics in your manuscript, R Markdown makes this possible through HTML/LaTeX inline code which allows you to calculate simple expressions integrated to your narrative. Inline code enables you to insert r code into your document to dynamically updated portions of your text. In other words, if your data set changes for any reason the code will automatically update the calculation specified.
This can be helpful when referring to specific variables on your data. For example, you should include numbers that are derived from the data as code not as numbers. Thus, rather than writing “The CSV file contains choice consistency data for 10.000 simulated participants” (FIXME8), replace the static number with a bit of code that, when evaluated, gives you a dynamic number if anything changes on your dataset. Please note that this insertion is not included in the visual editor, so we need to do write an expression, for example:
The CSV file contains choice consistency data for r nrow(bronars_simulation_data.csv) simulated participants.
When you knit you might get an error. Any idea why? That is because we need to make sure to import the dataset we are referring to and call it in R Markdown before the inline code can work. Let’s follow this process by including:
r bronars_simulation_data <- read.csv("../../data/bronars_simulation_data.csv")
Time to Knit! If you update your dataset this value will match the number of rows.
CHALLENGE 6.1 - Adding inline code
Suppose we would like to add some information to the sentence we have just adjusted in our manuscript. We would like to include the average for the variable violation_count present in the same dataset. Which inline code we would have to add to following sentence?
The CSV file contains choice consistency data for `
r nrow(bronars_simulation_data.csv)` simulated participants, that have been used to determine the power of our food-choice task design to detect choice consistency violations, which averaged `enter inline code here`. What inline code would you enter? What number would replace the inline code?Tip: we will need to use a
dataset$variablesyntax!Solution:
`
r mean(bronars_simulation_data$violation_count)` 5.3924
Important Note:
Make sure the file you are calling is in the right subdirectory and your working directory is set appropriately.
More on inline codes:
R Markdown will always display the results of inline code, but not the code. Inline expressions do not take knitr options.
Keyboard Shortcuts
As you become a more regular Rstudio user, you may also consider using some keyboard shortcuts for all basic editing tasks. Visual mode supports both traditional keyboard shortcuts (e.g. ⌘ B for bold) as well as markdown shortcuts (using markdown syntax directly). For example, enclose bold text in asterisks or type ## and press space to create a second level heading. Here are some of the most commonly used shortcuts for Mac users:
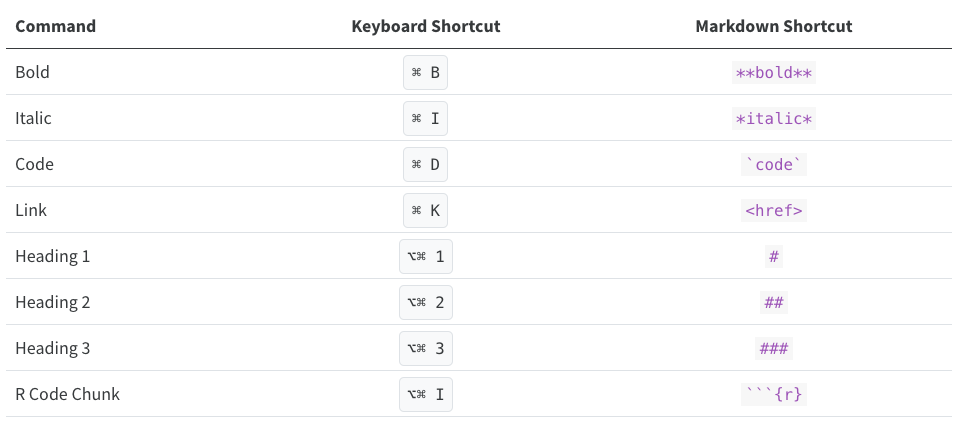
Tip: Windows users should replace in the shortcuts above ⌘ by ctrl and ⌥⌘ by alt (+) ctrl.
Other Editing Features
The visual editor allows users to insert images by browsing their location or copying and pasting it to the rmd document directly. There are also options to add html, line blocks, blockquotes, and footnotes. Up next we will learn more about how to add code chunks. In further episodes we will also learn how to insert citations and create a bibliography.
Time to Commit!
Make sure to commit your changes to GitHub. Add your changed files and commit with the following message: “Added Formatting”
Key Points
The visual editor has made formatting much easier.
You can apply rmd styling without prior R Markdown knowledge.
You can include inline code to narratives for basic calculations and dynamic information.
Collaborating via Github
Overview
Time: 15 minObjectives
Authenticate with Github.
Connecting your project to Github.
Make changes locally and push them to Github.
In episode 5 we learned about using version control as you write your publication. In this part of the workshop we’ll setup Rstudio to authenticate with Github which is necessary to push your changes to Github.
Terminology: Git Push and Pull
Definition: The process of syncronizing your local git repository with your git repository on Github (or other Git server).
Authenticating with GitHub
Github used to allow simple Username & Password authentication but now Github requires a more secure method of authentication. There are two options to authenticate: Personal Access Tokens (PAT) and SSH. This workshop outlines both methods for authentication.
PAT
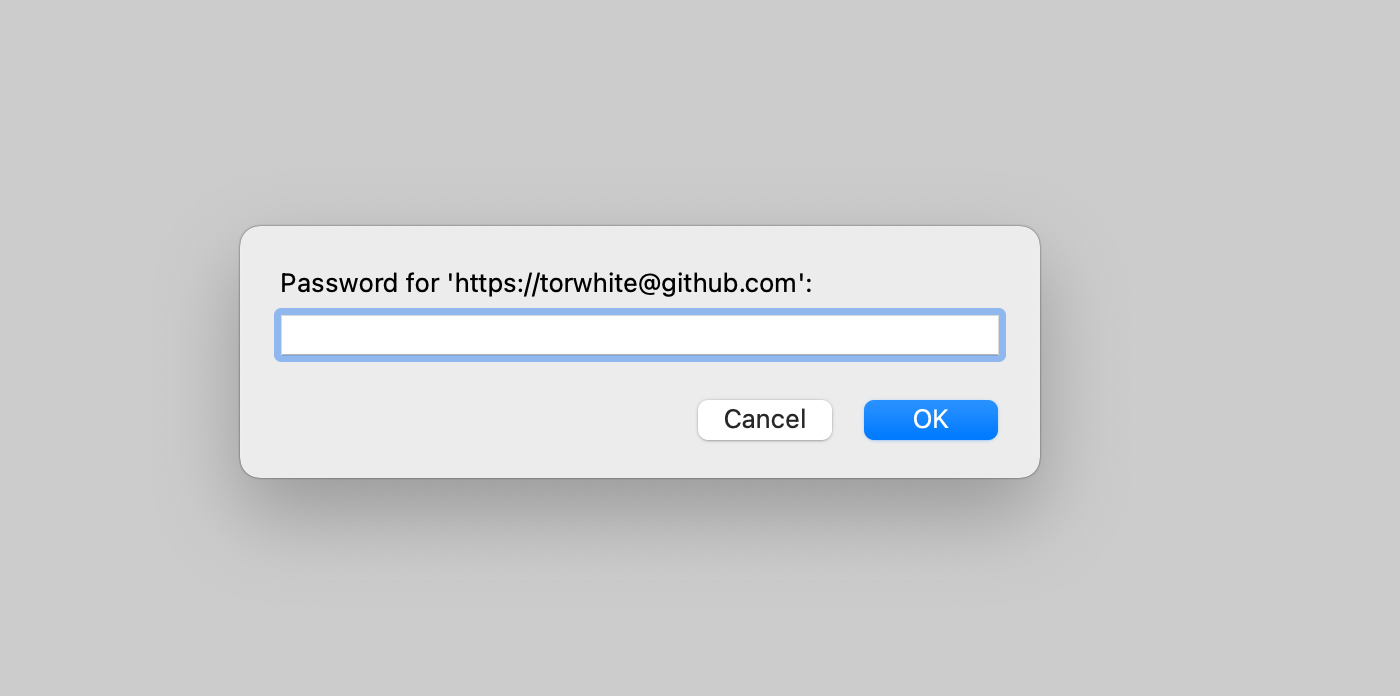
If this is the first time you are using Git in RStudio, when you push to GitHub from the RStudio IDE, you’ll likely be met with a login request:
On a Windows device it will look like this:
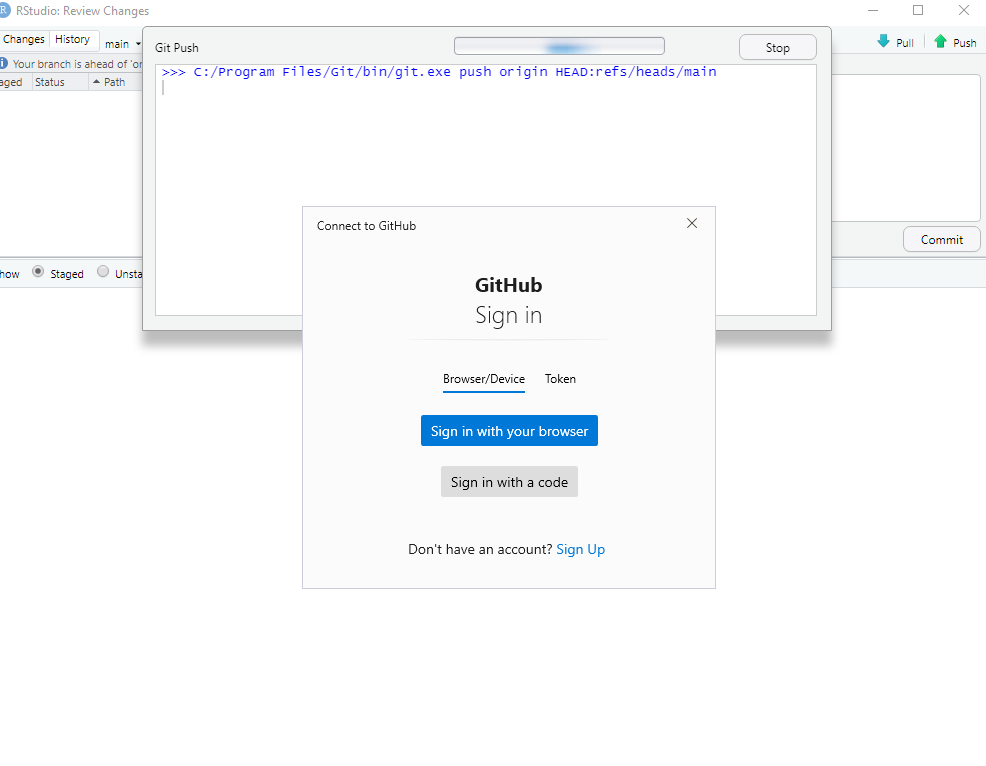
on a Mac it will look like this:
Ok, we are going to use PAT
Go to GitHub page, click on your icon/picture in the top right-hand corner, Go to Settings > Developer Settings > Personal Access Tokens and Click on Generate new token . Add a note on what it’s for, choose expiration, and scope. Click generate token at bottom of page. Once done, copy the token and save it somewhere - it will not display again on GitHub after this point.
Ok, back to RStudio:
On Windows navigate to the Token tab of the login:
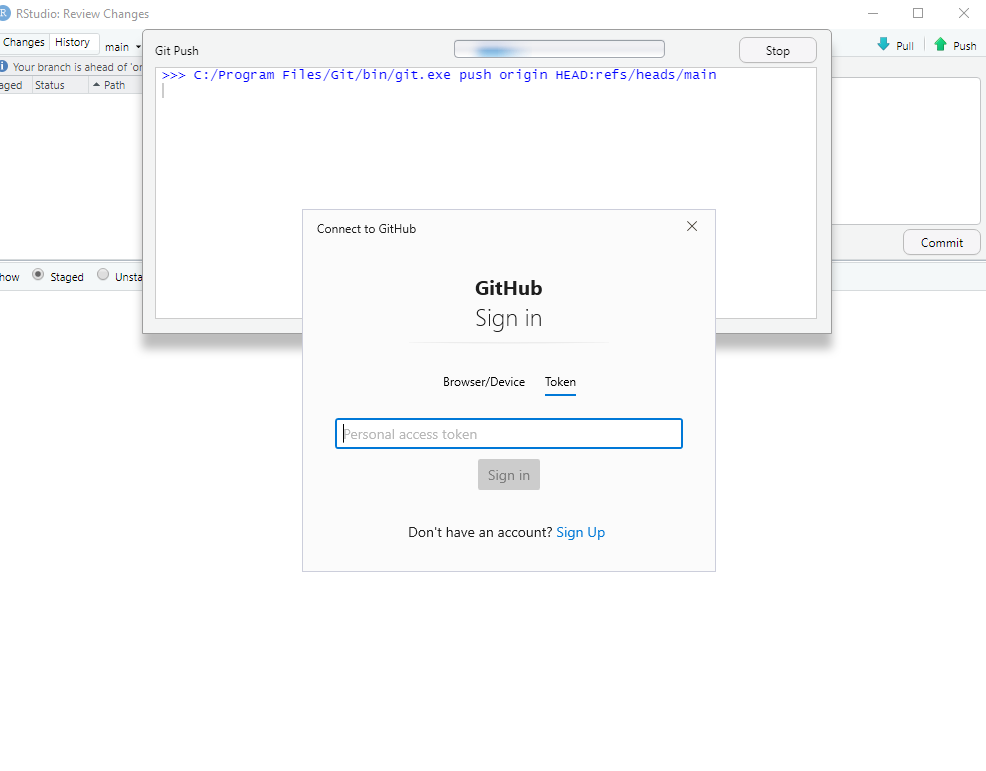
paste in your token
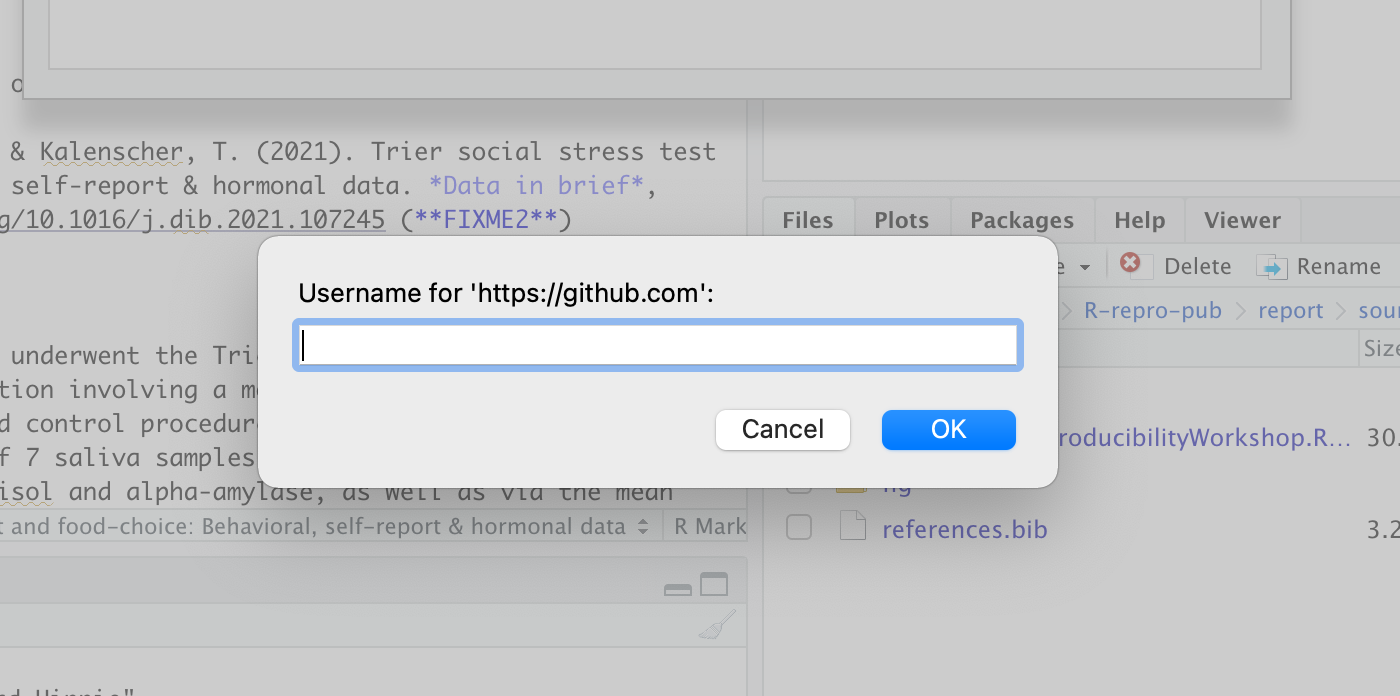
On Mac:
add your GitHub username when prompted:
And when asked for a password in the next prompt, paste in your PAT:
SSH
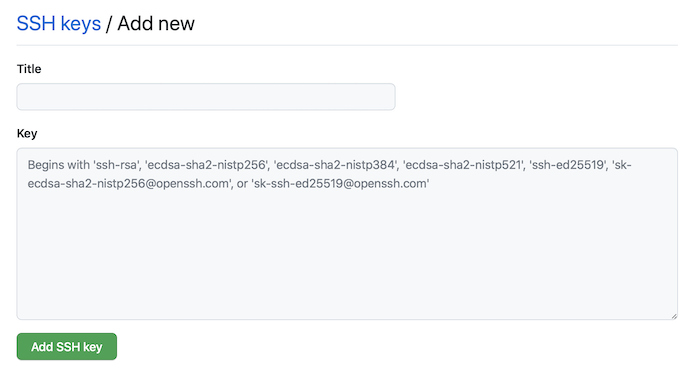
For this workshop we’ll be using the SSH Key method. If you’ve used SSH authentication before with some other program or service you can likely use your existing keys. If you do not yet have a pair of SSH keys you can create them using RStudio.
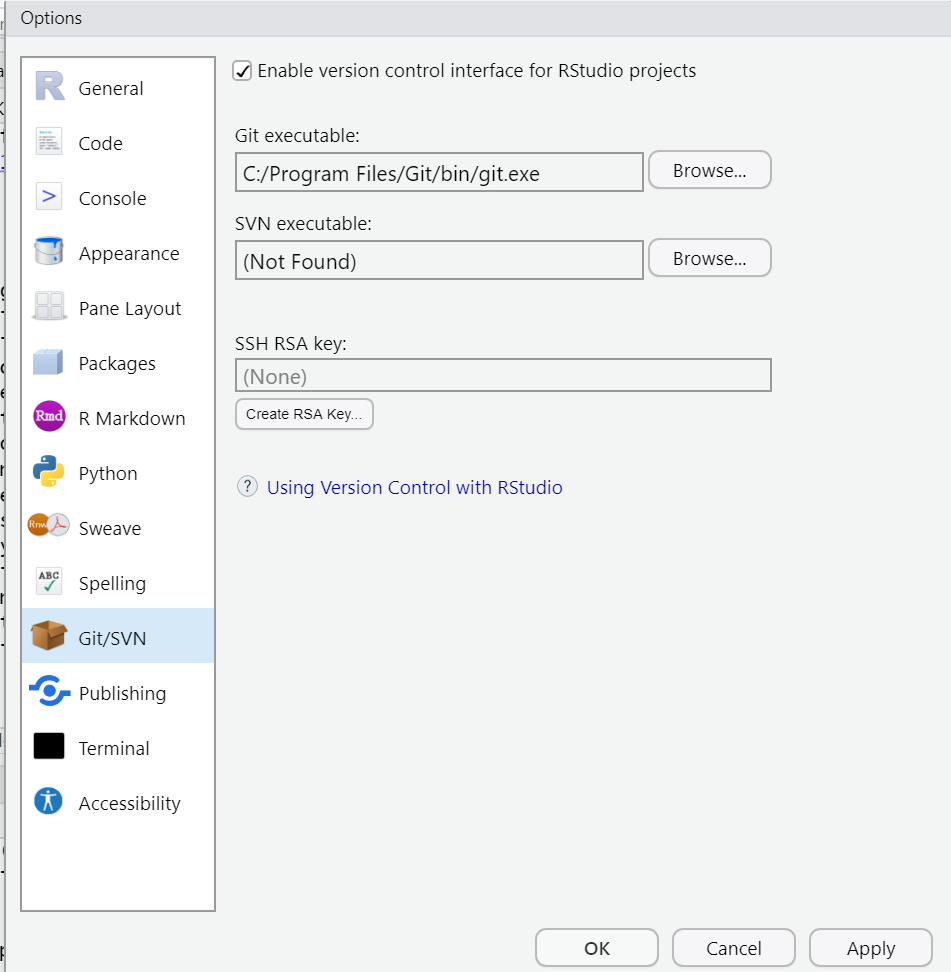
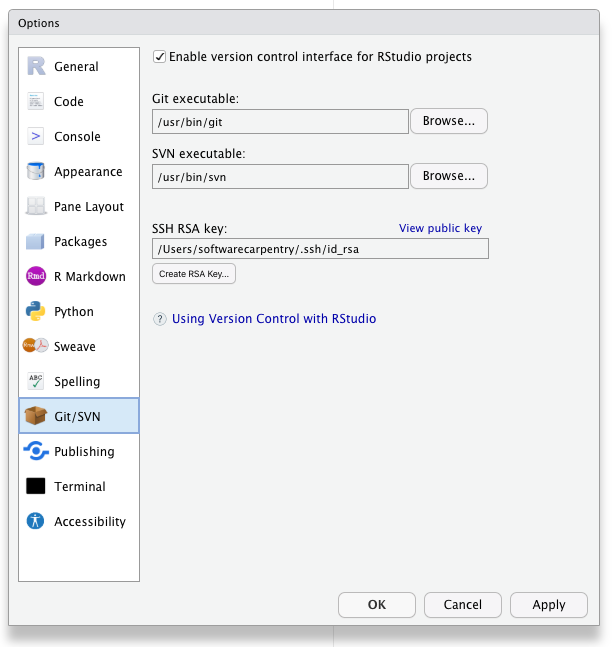
- Check for your local SSH keys. Tools –> Global Options –> Git/SVN.
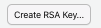
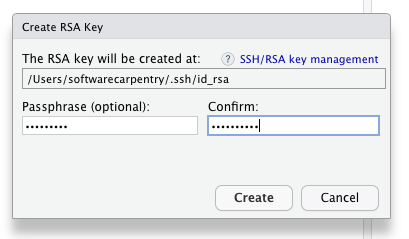
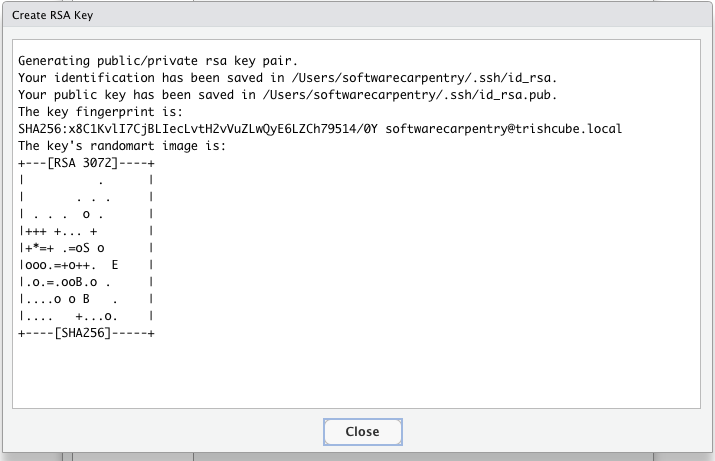
- If your “SSH RSA key” field is blank then you do not yet have SSH Keys and you should generate keys by clicking the “create RSA key” button.
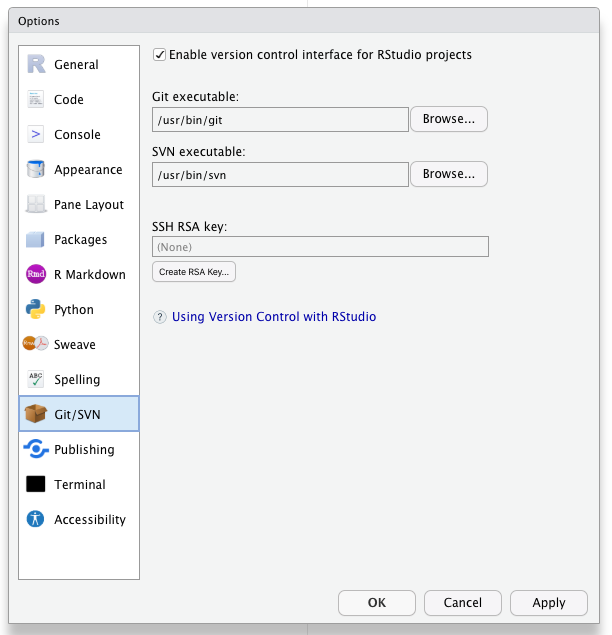
 Set your passphrase and don’t forget it. Store your passphrase in your password manager.
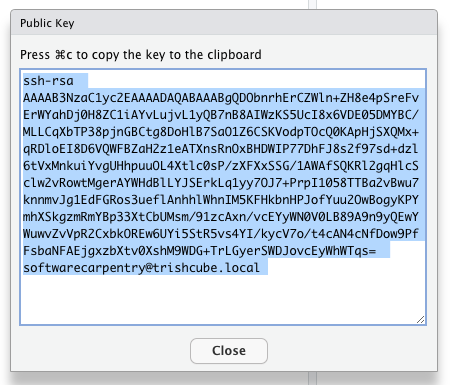
Click “View Public Key” in RStudio –> Tools –> Global Options –> Git/SVN and copy the public key cypher text.
Now that you have a public key you need to add it to your account on Github.
- Login to your Github account with your web browser. https://github.com
- If you have not yet added your Public SSH key to your Github account in “Setting –> SSH and GPG keys” do so.
Click the “New SSH Key” button in Github
 then paste it into the form.
Now you can authenticate with Github using your SSH keys. Test this in the terminal with:
ssh -T git@github.com
Getting your repository’s URL from Github
You can get the address of your repository from Github by navigating to your repository on Github.com and clicking the green “Code” button. Make sure to copy the SSH form of the URL.

With that address you can complete setting the origin URL in the next step.
Checking and Setting the “Origin” for the local copy of yoiur repository.
If you forked and cloned the demonstration publication for this workshop as covered in an earlier episode then your copy of the repository should already have the “origin” set. Once the “origin” is set properly you should be able to push and pull your changes to and from Github. When you clone a repository from Github your local copy of the repository should have Github set as the “origin”. When you’re using SSH to authenticate with Github you’ll need to use the SSH form of your repository’s URL as your “Origin”
You can check this in Rstudio –> Tools –> Project Options –> Git/SVN
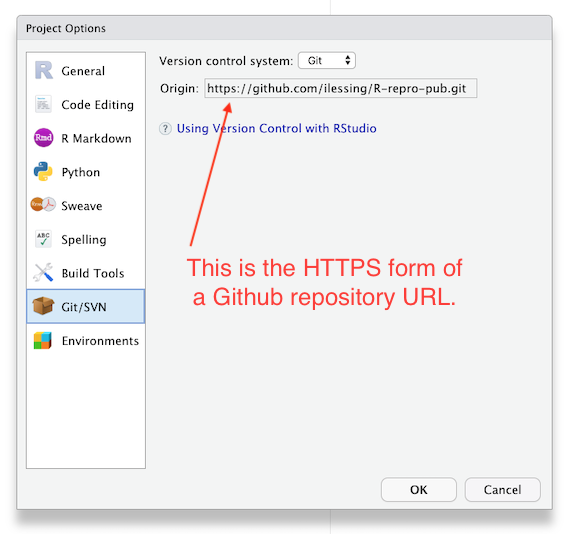
If the “Origin” field has the HTTPS form of your repository’s URL then you’ll need to update it from the terminal with command like:
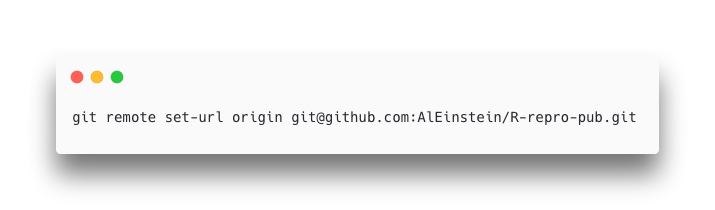
git remote set-url origin <paste your repository address here>
Be sure to put your Github username in the URL.
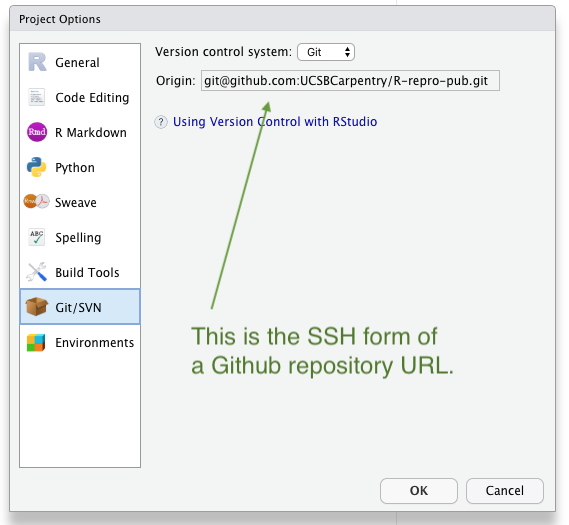
After you’ve updated the Origin URL from the command line go back to R Studio –> Tools –> Project Options –> Git/SVN to verify you have the SSH form of the URL in your “Origin” field. It should look something like this.
If the “Origin” field is blank then you’ll need to add it from the terminal with a couple of terminal commands like this:
git remote add origin <paste your repository address here>
git fetch --set-upstream origin main
Push your local changes up to your repository Github.
With authentication set up and your local copy of your repository pointing to Github as the “Origin” you should be able to make changes and push them up to Github. Let’s try it and see if it works.
Challenge: Push to Github
- Make a change to one of the files in your project or add a new file.
- In R Studio’s Git panel check the box to Stage the changed file.
- Commit the change to your Git repository.
- Click the green up arrow to Push you repository changes up to Github.
- Look on Github.com to verify your changes are there.
With the ability to synchronize your changes between Github and your local the next step is explore options for publishing your research paper.
Key Points
Setting up R Studio to authenticate with Github using SSH Keys.
Setting the Git repository Origin in your R Studio project enables pushing and pulling from your local copy of the repository to the repository on Github.
Publishing your project
Overview
Time: 10 minObjectives
Identify different ways you can publish your project.
Overview of some free and open resources available.
Learn which factors should guide your decision-making process.
What is Next?
Once you have completed your rmd manuscript following all the best practices for reproducibility, including organizing your project files what is next? The answer depends on your plans to move forward. Let’s explore some scenarios:
If you plan to share your insights with your community right away
Publishing with Rpubs
- The easiest way would be to use Rpubs which is a publishing integrated with Rstudio. Rpubs is a bare-bones web hosting service created for the sole purpose of hosting R Markdown documents. It provides no other services— no support for search, collaboration, persistent identifers, or versioning. But, it is the simplest and most direct way of getting your R Markdown document published on the web directly from RStudio. For a more full-featured hosting service consider GitHub and GitHub Pages, described later.
Notice the “Publish” button in the upper right corner of your Knit output. Click this to publish to Rpubs. This is where you’ll need an Rpubs account as mentioned in setup for this workshop.
Click the publish button

and you’ll be presented with the following panels:
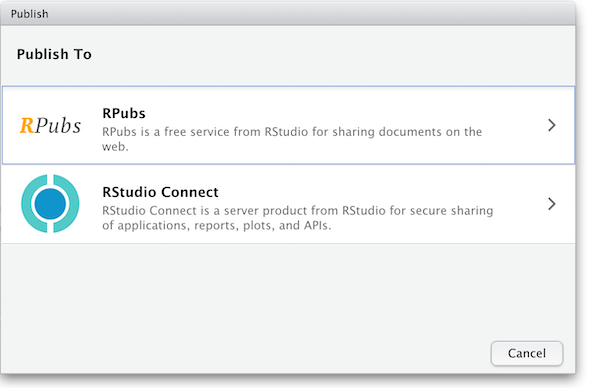 (The other option in the dialog box, RStudio Connect, is a standalone publishing platform for teams to share content. It requires purchase to host and use.)
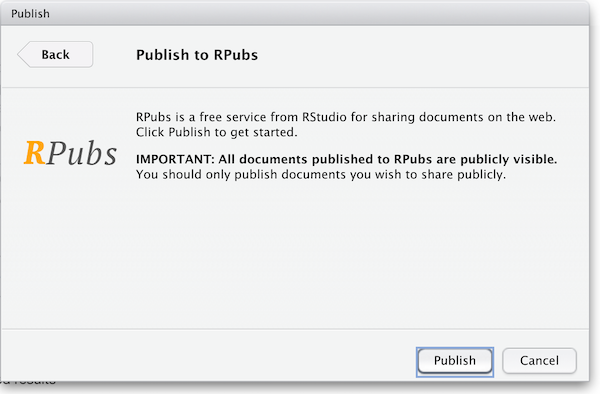
The first time you publish, RStudio will likely ask if you want to install some needed packages; say yes. RStudio will then open up a web browser to allow you sign in to rpubs.com.
At the end of the publish process your paper will be live on the internet
with a URL similar to: https://rpubs.com/yourname/678624
RStudio also saves an HTML version of your knit document to your local file system. Look for it in the results
directory in the same directory as the R-markdown file in your R-Studio project directory.
This html document is self-contained and highly portable. Images are encoded directly into the HTML so you can easily move it to any web hosting you have available.
Publishing as website on GitHub
Another, better, but slightly more involved option for publishing an R Markdown document on the web is to use GitHub and GitHub Pages. It is out of the scope of this lesson to use GitHub, but briefly, GitHub is a widely-used version control and collaboration system. RStudio has built-in support for GitHub: in the upper right panel of your RStudio window, look for the Git tab, which allows you to sync your R Markdown project with a remote repository stored on github.com. To enable publishing to GitHub Pages, go to the Settings page of your repository on GitHub and select a branch (“branch” is a repository term) to publish. Name your main R Markdown file index.Rmd, and render it to HTML as index.html. With GitHub Pages enabled on your repository, the HTML file in your repository at https://github.com/myusername/myrepo/index.html will appear on the web as https://myusername.github.io/.
Other document types
When you create a new R-markdown file in R Studio you are presented with a choice of Output Formats:
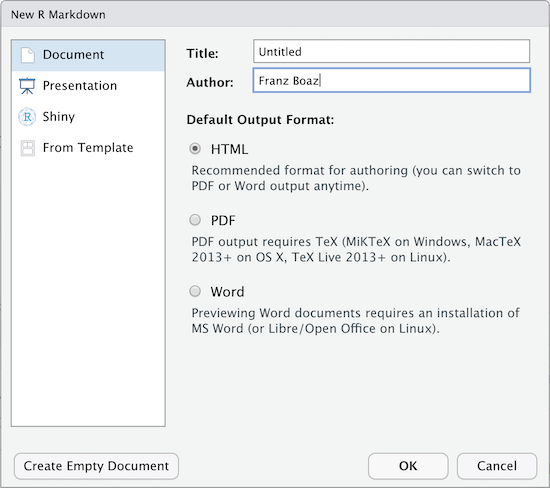
For the purposes of this workshop we’re using HTML as the output format but other types are available. You can render your R Markdown as a document, a presentation or a Shiny app. With the default installation of R-Studio HTML output is most likely to work. Other formats may require additional R packages and/or code libraries be installed on your computer. R Studio also has a templating system to help with creating R Markdown files with common elements, YAML metadata and rendering instructions. This can be very helpful for example if you want to create a weekly or monthly report documenting an ongoing experiment, study or other changing data.
If you are willing to publish your manuscript through a peer-reviewed journal
- Most journals now request the underlying data, code and documentation to be shared along with the manuscript, so in that case you will have that handy. Whenever possible, give preference to open-access journals with data sharing recommendations to foster open science, transparency and research reproducibility. The TOP Factor allows you to search by journal title and/or discipline and will rank journals compliance with those principles.
- If your chosen journal does not require nor recommend a particular process for making your project data available (some will dictate what, where and how project data should be uploaded), you may still consider depositing your project files in a reliable data repository and cross-reference paper and project data, ideally with a formal citation containing a Persistent Identifier(e.g., DOI, ARK, handle, Pur) to avoid link rot.
- In terms of data repositories, there are many options available, and they can be disciplinary, instituional or generalist (e.g., Zenodo, Figshare). For a compreheensive list of options available please refer to the Registry of Research Data Repositories. At UCSB Library we support Dryad. If Dryad is not suitable for your needs, Research Data Services can assist you finding a more optimal solution for archiving your project data.
Key Points
You may choose to share and publish your data project before publishing its associated manuscript.
Sharing the code, data and documentation is necessary to allow for inspection and research reproducibility.